Desert Sunset Photography: Unlocking the Secrets of Golden Hour
The desert at sunset is one of the world’s most dramatic natural theaters. The light changes rapidly, creating a painterly effect.
Mastering Desert Sunset Photography allows you to capture this fleeting magic.
It requires preparation, precise timing, and the right technical skills.
This guide provides professional insights to elevate your Desert Photography to the next level.
1. Timing is Everything in Desert Sunset Photography
The golden hour is not actually an hour long. It is a brief window of intense, warm light.
For truly breathtaking Desert Sunset Photography, you must arrive early.
Be set up and ready at least one hour before the official sunset time.
This pre-sunset phase is often called the pre-golden hour.
It provides soft, directional light that is ideal for detailed portraits.
2. The Professional Desert Photos Checklist: Gear Essentials
A successful session begins with the right equipment for Desert Sunset Photography.
Camera Bodies
A camera with good dynamic range is essential. This helps manage the bright sky and dark foreground shadows.
A full-frame sensor will maximize light-gathering capabilities.
This is a critical step for securing Professional Desert Photos.
Lens Choice: Wide vs. Telephoto
A wide-angle lens (16mm to 35mm) is perfect for capturing the sweeping scale of the dunes and the entire sky.
A telephoto lens (70mm to 200mm) compresses the scene. It makes the sun appear much larger relative to the subject.
Both lenses offer different, powerful approaches to Desert Sunset Photography.
Tripod and Protection
A sturdy tripod is non-negotiable for low-light Capture Desert Sunset shots. It ensures sharpness during longer exposures.
Crucially, bring sealed bags and lens cloths to protect your equipment from the fine desert sand.
This simple preparation prevents expensive damage during your Desert Photography.
3. Exposure Mastery: Capture Desert Sunset Techniques
Controlling exposure is the biggest challenge in Desert Sunset Photography.
The sky is bright, but the foreground is often dark.
Metering for the Sky
If you meter for the sky, the foreground will become a deep silhouette. This creates dramatic, high-contrast Arabian Desert Sunset images.
Metering for the Foreground
If you meter for the foreground, the sky will often be blown out, losing all the beautiful color.
Most professionals bracket their shots. Bracketing involves taking three or more photos at different exposures.
This technique is key to successful Capture Desert Sunset images.
4. Focus and Sharpness in Desert Sunset Photography
Achieving sharp focus in low light requires special attention during Desert Sunset Photography.
Manual Focus is Key
Autofocus can struggle in the dim light of the Desert Golden Hour.
Switch to manual focus. Magnify the view on your camera screen and focus on a high-contrast edge, such as the dune crest.
This ensures critical focus for your Professional Desert Photos.
Hyperfocal Distance
For sweeping landscape shots, setting the focus to the hyperfocal distance maximizes the depth of field.
This keeps both the near foreground and the distant horizon sharp.
This is an advanced Sunset Photography Guide tip for maximum clarity.
5. Compositional Secrets for Best Desert Photography
Composition transforms a snapshot into true Best Desert Photography.
The Golden Rule: Leading Lines
The curving lines of the sand dunes are perfect leading lines. Use them to guide the viewer’s eye toward the setting sun or your subject.
These natural lines add flow and depth to the Desert Sunset Photography image.
Rule of Thirds for Sun Placement
Avoid placing the sun directly in the center of the frame.
Place it on one of the upper third lines. This makes the image more dynamic and engaging.
This simple compositional rule enhances your Sunset Photo Tips success.
6. Managing Color and White Balance
The color temperature shifts rapidly during the Desert Golden Hour.
Manual White Balance
Avoid Auto White Balance (AWB). AWB tries to neutralize the warm tones of the sunset.
Set your white balance manually to ‘Cloudy’ or ‘Shade’ to exaggerate and enhance the beautiful warm colors.
This boosts the natural orange and red hues of the Arabian Desert Sunset.
Post-Processing Color Grading
Editing is where you refine the color. Use the white balance and tint sliders to subtly enhance the sunset tones.
Be cautious not to over-saturate, which can make the image look unnatural.
7. Creative Use of Shadows and Silhouettes
Shadows are as important as light in Desert Sunset Photography.
The Silhouette Effect
During the sunset, position your subject directly between your camera and the sun.
Expose for the sky, turning your subject into a dramatic silhouette.
This creates high-impact Dubai Sunset Photography images with minimal distractions.
Long Shadows
The low sun angle creates incredible long shadows that stretch across the dunes.
Incorporate these shadows into your composition. They emphasize the texture and scale of the Desert Photography.
8. Choosing the Best Desert Photography Location
The location determines the quality of the light and the beauty of the backdrop.
Red Dunes of Al Lahbab
The deep red sand of Al Lahbab offers a stunning contrast against the blue and orange sky.
The height of these dunes provides excellent, clear vantage points for Capture Desert Sunset shots.
This area is a top choice for Professional Desert Photos sessions.
Undulating Lines
Look for dunes that have sharp, clean crests and gentle, flowing curves.
These lines provide the best natural composition for your Desert Sunset Photography.
9. Working with Subjects: Professional Desert Photos
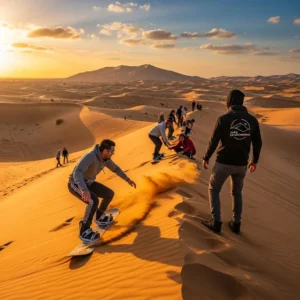
Adding a person, a camel, or a tent transforms the scale of your Desert Sunset Photography.
Scale and Context
A small human figure placed far away provides scale, emphasizing the vastness of the Arabian Desert.
Ask your subject to gaze toward the sunset for a sense of awe and wonder.
This technique creates profound Best Desert Photography.
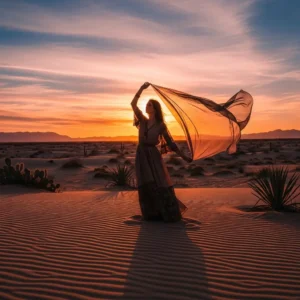
Flowing Fabric
For fashion or portraiture, use long, flowing fabric or dresses.
The desert breeze will catch the material, adding dynamic movement to the static Sunset Photo Tips session.
This works especially well for Dubai Sunset Photography clients.
10. Dealing with Lens Flare in Desert Sunset Photography
Shooting directly into the sun often causes lens flare, which can be disruptive.
Using Your Hand
Use your hand (just out of frame) or a small object to momentarily block the sun. This eliminates the flare.
Then, quickly remove your hand for the exposure. This is a clever Desert Photography hack.
Embracing the Flare
Sometimes, a small amount of lens flare can add character.
Let it peek into the corner of the frame for a deliberate, artistic touch.
Ensure the flare doesn’t cover your main subject in your Arabian Desert Sunset image.
11. Advanced Bracketing and HDR for Capture Desert Sunset
To retain detail in both the sky and the shadows, advanced exposure techniques are required.
High Dynamic Range (HDR)
Use bracketing to capture three or more images: one exposed for the sky, one for the midtones, and one for the shadows.
Merge these images in post-processing software to create a single HDR photo.
This ensures maximum detail retention in your Capture Desert Sunset files.
Post-Processing Tone Mapping
Tone mapping is the process of adjusting the contrast and brightness across the entire image.
This technique brightens the shadows without blowing out the highlights of the Desert Sunset Photography.
This is essential for high-quality Professional Desert Photos.
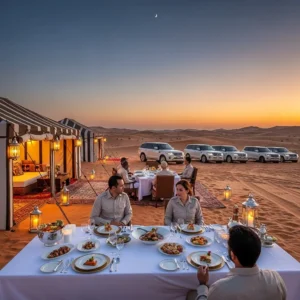
12. Utilizing External Links for Planning and Booking
To ensure you are in the right place at the right time, careful planning is necessary.
Consulting reliable external links helps you choose the perfect safari.
Operators like https://hafiztourism.com/ offer specialized tours that prioritize the golden hour.
Booking a private tour through https://dubaidesertsafarie.com/ ensures maximum time for your Desert Sunset Photography.
13. The Blue Hour After Desert Sunset Photography
Do not pack up immediately after the sun drops below the horizon.
The period immediately following sunset is the Blue Hour.
The sky takes on deep, rich blue and purple tones, perfect for Desert Photography silhouettes.
This cool light offers a beautiful contrast to the warm Desert Sunset Photography you just captured.
14. Including Internal Links for Exclusive Shoots
For the most exclusive and dedicated Desert Sunset Photography experience, a luxury, bespoke safari is recommended.
These packages prioritize light and location over group scheduling.
Check the specialized offerings at https://royaldesertadventures.ae/ for private access to prime shooting locations.
This ensures you maximize your potential for unique, high-quality images.
15. The Role of Clouds in Arabian Desert Sunset
While the desert is known for clear skies, clouds can be a photographer’s best friend during an Arabian Desert Sunset.
Clouds catch the brilliant light of the sunset. They reflect and scatter the color across the sky.
This creates texture and drama that a cloudless sky cannot replicate.
Be ready to shoot quickly when clouds begin to glow in your Desert Photography.
16. Post-Processing: Removing Distractions
The desert is vast, but man-made elements sometimes appear.
Look for distant vehicles, electrical wires, or discarded items in your frame.
Use the cloning or healing tools in your editing software to remove these distractions cleanly.
This ensures your Professional Desert Photos look pristine and untouched.
17. Storytelling Through Desert Sunset Photography
The best Best Desert Photography tells a compelling story.
Think about the emotion you want to convey: solitude, adventure, or romance.
The subject’s pose and the composition should support this narrative.
A single figure walking away from the camera suggests a long journey in the Desert Sunset Photography.
18. Using Filters for Capture Desert Sunset
Professional photographers often use filters to manage light during Capture Desert Sunset.
A Graduated Neutral Density (GND) filter darkens the bright sky while leaving the foreground untouched.
This helps even out the extreme exposure difference before the shot is even taken.
It is a crucial tool for advanced Desert Photography.
19. Practical Safety Tips for Desert Sunset Photography
Your safety is paramount during your Desert Golden Hour shoot.
The desert becomes disorienting quickly in the dark.
Stay close to your vehicle and guide. Do not wander too far in search of the perfect dune.
Always carry water and wear closed-toe shoes to protect against scorpions and snakes.
20. Final Thoughts on Mastering Desert Sunset Photography
Desert Sunset Photography is a highly rewarding genre. It demands technical precision and creative vision.
By mastering timing, understanding light, and protecting your gear, you will capture truly incredible images.
Embrace the challenge of the Desert Golden Hour. Your patience will be rewarded with stunning, unforgettable Professional Desert Photos.
Frequently Asked Questions (FAQs) – Long Answers
1. What is the single most critical factor that distinguishes amateur Desert Sunset Photography from a professional shot?
The single most critical factor distinguishing amateur Desert Sunset Photography from a professional shot is exposure control and the management of dynamic range. Amateurs often end up with an image where the sky is perfectly exposed but the foreground is entirely black (a pure silhouette), or the foreground is exposed but the sky is completely white (blown out). Professionals use techniques like exposure bracketing and HDR or employ specialized Graduated Neutral Density (GND) filters. This ensures they capture detail in both the bright highlights of the sun and the deep shadows of the dunes, resulting in a balanced, detailed Professional Desert Photos image.
2. How does using a telephoto lens (e.g., 200mm) drastically change the look and impact of Desert Sunset Photography compared to a wide-angle lens?
Using a telephoto lens drastically changes the look of Desert Sunset Photography by employing compression and magnification. A telephoto lens compresses the distance between the foreground dunes and the background sun, making the sun appear much larger and closer to the subject or horizon than it actually is. This creates a powerful, cinematic, and intense visual impact, emphasizing the immense scale of the sun and drawing attention to its colors. In contrast, a wide-angle lens makes the sun appear small while emphasizing the vast, sweeping scale of the foreground dunes in the Capture Desert Sunset image.
3. Why is it highly recommended to use the manual White Balance setting (Cloudy or Shade) rather than Auto White Balance for Desert Sunset Photography?
It is highly recommended to use the manual White Balance setting (specifically ‘Cloudy’ or ‘Shade’) for Desert Sunset Photography because Auto White Balance (AWB) works to neutralize color casts. During the golden hour, the light is naturally colored with rich orange, red, and yellow tones. AWB will incorrectly interpret these beautiful, warm tones as a mistake and attempt to cool the image down by adding blue, thus stripping the photo of its vibrant sunset colors. By manually setting the white balance to a warmer preset, you successfully intensify the natural warmth of the Arabian Desert Sunset for a more impactful image.
4. What are the key elements of composition that professional photographers prioritize when shooting the vast, curved lines of the sand dunes?
Professional photographers prioritize leading lines and the rule of thirds when composing shots of the dunes for Desert Photography. They use the sharp crests and flowing curves of the dunes as natural leading lines to direct the viewer’s eye towards the main point of interest—the setting sun or a small subject. They also utilize the rule of thirds by ensuring the horizon is not centered and that the sun, or the main subject, is positioned on one of the four intersecting points in the frame. This gives the Best Desert Photography a sense of balance, depth, and visual flow, making the image highly dynamic.
5. Besides the red dunes of Al Lahbab, what other types of desert terrain or features are sought after for the most unique Dubai Sunset Photography opportunities?
Besides the red dunes of Al Lahbab, unique Dubai Sunset Photography opportunities can be found in several other terrains. Pristine, untouched sand sheets are sought after for abstract, minimalist images that emphasize texture. Salt flats (sabkhas), found near the coast, offer unique, reflective surfaces that can mirror the sunset colors. Furthermore, the inclusion of Ghaf trees or other desert flora provides a beautiful, natural frame and foreground interest, breaking the monotony of the dunes and adding biological context to the Capture Desert Sunset image.
6. How does the technique of “shooting into the shadows” help create more dramatic and compelling Desert Sunset Photography?
The technique of “shooting into the shadows” is essential for creating more dramatic and compelling Desert Sunset Photography because the low sun angle dramatically exaggerates all shadows and textures. By exposing your shot to correctly capture the highlights (the sun and sky), the areas not directly hit by the sun fall into deep shadow. This creates a stunning contrast that emphasizes the texture and form of the dunes. The long, dramatic shadows act as leading lines and add a sense of mystery and depth to the overall Desert Photography composition.
7. When booking a Desert Photography trip, what are the essential questions to ask the safari operator regarding timing and location access?
When booking a Desert Photography trip, essential questions to ask the operator (especially those found on external links like https://hafiztourism.com/ or https://dubaidesertsafarie.com/) revolve around light priority and access. Key questions are: 1. Will we be at the primary dune location at least one hour before the official sunset time? (Crucial for the Golden Hour). 2. Is the trip private or semi-private? (Group tours rush the light). 3. Can the vehicle access high dunes with clear horizons? These answers determine if the tour is merely a viewing experience or a true Professional Desert Photos session.
8. What are the key benefits and drawbacks of using an ND filter (Neutral Density) versus an HDR technique for Desert Golden Hour shooting?
Both ND filters and HDR techniques address the extreme dynamic range of the Desert Golden Hour. The benefit of an ND filter (specifically a GND filter) is that it solves the exposure problem in-camera during a single capture, which is ideal for capturing moving subjects or action, and it produces a more natural look. The drawback is the filter cost and potential for vignetting. The benefit of HDR is its ability to recover detail from shadows that even a filter might not handle. The drawback is that it requires multiple frames, making it unsuitable for motion, and the final image often needs more extensive editing to avoid an artificial, “over-processed” look in the Desert Sunset Photography.
9. For a photographer, what are the specific advantages of booking an exclusive package through a provider like https://royaldesertadventures.ae/?
The specific advantages of booking an exclusive package through a provider like https://royaldesertadventures.ae/ for Desert Sunset Photography are centered on control and exclusivity. Advantages include: Dedicated time tailored precisely to the Golden and Blue Hours; Private access to pristine dunes without other tourists or vehicles; Bespoke transport that can navigate to the highest and most remote shooting locations; and the potential for specialized props or models to enhance the Professional Desert Photos outcome. This premium service removes all logistical constraints associated with group safaris.
10. How can a photographer effectively use the “Blue Hour” (after the sun sets) to complement their vibrant Arabian Desert Sunset shots?
A photographer can effectively use the “Blue Hour” to complement their vibrant Arabian Desert Sunset shots by focusing on cool, monochromatic contrast and silhouettes. The Blue Hour light is cool, deep blue, and even, which serves as a perfect backdrop for minimalist silhouettes of subjects, trees, or tents. The blue tones contrast beautifully with the warm orange and red tones captured earlier during the golden hour, providing a well-rounded portfolio. The cool light is also excellent for long-exposure shots that aim to capture the Desert Photography mood and quiet solitude.
11. What are the critical differences in lens cleaning techniques required for desert conditions versus normal outdoor photography?
The critical differences in lens cleaning techniques for Desert Sunset Photography versus normal outdoor photography stem from the extremely fine, abrasive nature of desert sand. In the desert, you must never wipe the lens immediately with a cloth. Sand acts like sandpaper and will scratch the glass. The correct method is to first use a blower brush (or a professional air blower) to gently remove all loose sand particles. Only after all particles are gone should a specialized microfiber cloth be used with a cleaning solution for any remaining smudges. This essential Sunset Photo Tips knowledge protects your gear.
12. How does the phenomenon of “atmospheric haze” affect the quality of Desert Sunset Photography, and how can it be mitigated?
Atmospheric haze, which often appears as a milky, low-contrast layer, can significantly affect the quality of Desert Sunset Photography, making the background appear muted and soft. It is caused by dust and moisture particles suspended in the air. To mitigate it: 1. Shoot with a telephoto lens to cut through some haze and compress the view. 2. Use a polarizing filter if shooting perpendicular to the sun to reduce some light scatter. 3. In post-processing, use the ‘Dehaze’ slider or boost contrast to digitally cut through the haze and restore clarity to the Arabian Desert Sunset image.
13. What is the role of a polarizing filter in Desert Photography, and why is it sometimes avoided during the exact moment of sunset?
A polarizing filter plays a crucial role in Desert Photography by reducing glare and boosting color saturation. It darkens the blue sky, makes the clouds pop, and reduces the reflective glare off the sand and leaves. However, it is often avoided during the exact moment of sunset because it can unnecessarily darken the scene and create an uneven, artificial look in the sky, especially with wide-angle lenses. For the best Desert Sunset Photography, photographers often remove the polarizer during the golden hour and rely on post-processing to adjust color and contrast.
14. What are the legal or safety implications of wandering off to find a “perfect, untouched” dune for Best Desert Photography?
Wandering off to find a “perfect, untouched” dune for Best Desert Photography carries significant legal and safety implications and should be avoided. Safety first: The desert is extremely disorienting in low light, and you can quickly become lost. There is also the danger of local wildlife (snakes, scorpions) that become active at dusk. Legal: Many of the best, untouched dunes are within protected conservation areas or private reserve boundaries, and trespassing can result in heavy fines. Always stay within sight of your guide and vehicle, relying on trusted operators to secure legal access to prime Best Desert Photography spots.
15. When capturing a moving subject (like a camel) during the Desert Golden Hour, what camera setting adjustment is necessary to freeze the motion?
When capturing a moving subject, such as a camel, during the Desert Golden Hour, the critical camera adjustment needed to freeze the motion is a fast shutter speed. The exposure time needs to be fast enough to prevent motion blur. Depending on the speed of the subject, this generally requires a shutter speed of 1/500th of a second or faster. To compensate for the loss of light from the fast shutter speed, you must simultaneously increase the ISO and open your aperture wider (a lower f-number). This ensures the subject is sharp while still capturing a well-exposed Desert Sunset Photography image.