
Desert Shadows: 13 Critical Photography Mistakes and How to Master Them
The Dubai desert safari is a photographer’s dream—a vast canvas of golden light sweeping dunes and vibrant culture. Yet for many adventurers the reality of their photos falls frustratingly short of the breathtaking scenes they witnessed. They return home with images that feel flat washed-out or simply fail to capture the magic. This disconnect often stems from a series of common but easily correctable desert photography mistakes. These pitfalls can turn a potential masterpiece into a disappointing memory.
This guide is designed to be your antidote to photographic regret. We will illuminate the most frequent desert photography mistakes that even seasoned photographers can make in this challenging and unique environment. More importantly we will provide clear actionable solutions to transform each error into an opportunity for excellence. By understanding what not to do you will empower yourself to approach your desert safari with the confidence and skill needed to create images that truly reflect the beauty of the Arabian landscape. Let’s move beyond basic tips and delve into a masterclass on avoiding the errors that hold your photos back.
The Foundational Flaw: Poor Planning and Preparation
The most critical errors often happen before you even pick up the camera. The desert demands respect and preparation is your first step toward conquering it.
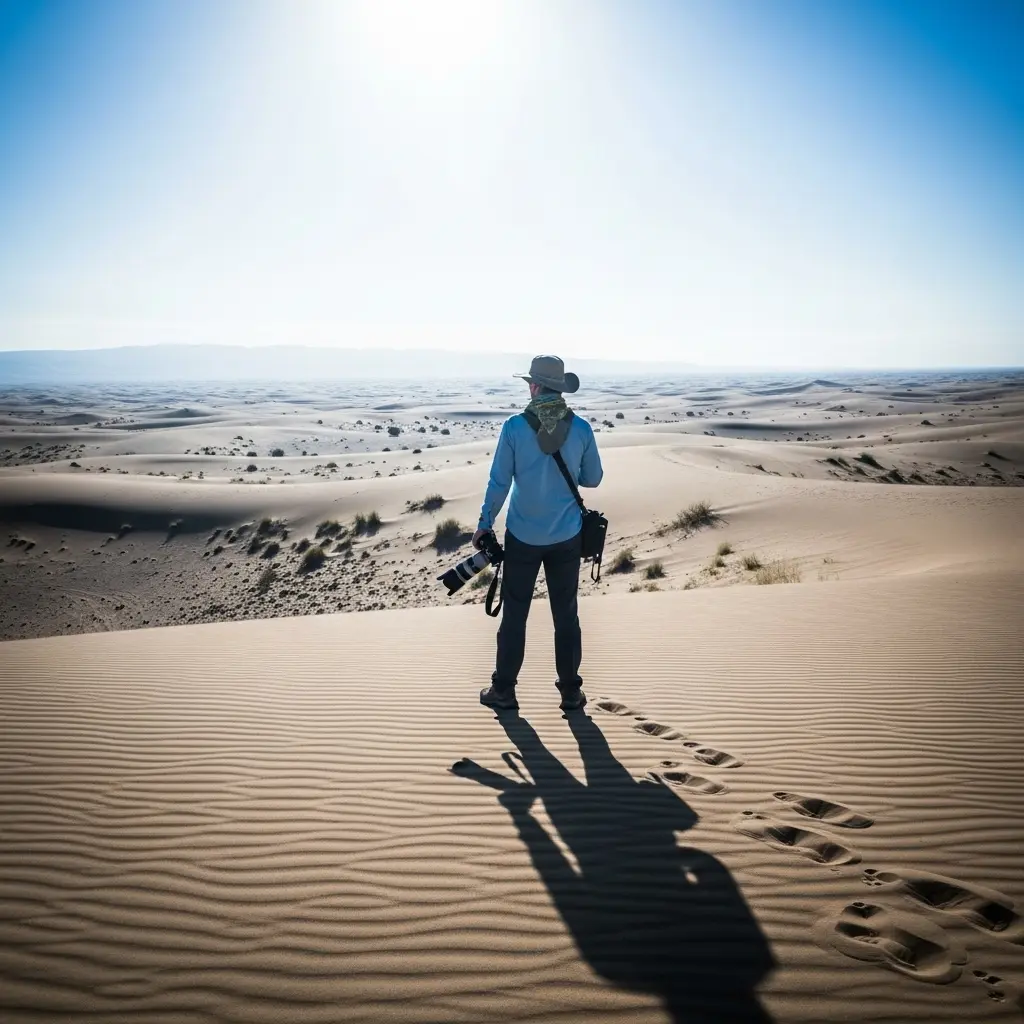
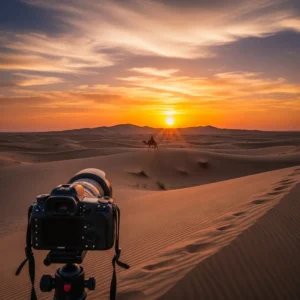
Mistake 1: Ignoring the “Golden Hour”
Perhaps the single greatest of all desert photography mistakes is shooting in the middle of the day. Between 10 a.m. and 4 p.m. the sun is directly overhead creating harsh unflattering light. This results in deep dark shadows on people’s faces washed-out colors in the sand and a flat uninteresting landscape with no texture.
The Solution: Embrace the Edges of the Day The “golden hour” (the first hour after sunrise and the last hour before sunset) is your magic window. The low-angle sun casts long beautiful shadows that reveal the intricate textures and ripples of the dunes. The light is soft warm and golden making everything look spectacular. Book an evening safari that is specifically timed to have you deep in the dunes as the sun begins to set. This one decision will improve your photos more than any piece of gear.
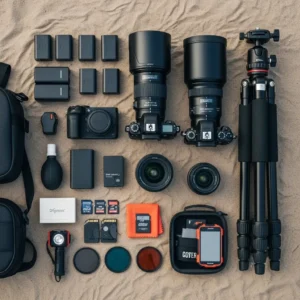
Mistake 2: Not Packing Protective Gear
The desert’s two main ingredients—sand and sun—are the arch-enemies of your camera. Fine sand can work its way into lenses and camera bodies causing irreparable damage while intense heat can cause electronics to overheat and fail.
The Solution: Armor Up Your Equipment Your camera bag is your first line of defense. A well-padded weather-resistant bag is essential. A simple UV filter serves as a cheap but effective bodyguard for the front element of your expensive lens protecting it from sand and scratches. Most importantly a rocket air blower is a non-negotiable tool. Use it to blow dust away before you ever attempt to wipe a lens. This prevents you from grinding abrasive sand particles into the glass.
Mistake 3: Underestimating Power Needs
The desert heat doesn’t just make you thirsty; it drains your batteries at an accelerated rate. There is nothing more frustrating than your camera dying just as the perfect sunset unfolds. This is a rookie mistake that can end your shoot prematurely.
The Solution: Pack More Power Than You Need Bring at least one fully charged spare battery for your dedicated camera. Two is even better. Additionally a high-capacity power bank is a lifeline. It can recharge your smartphone which you’ll be using for videos and behind-the-scenes shots and can also power many modern mirrorless cameras via USB-C. Being over-prepared with power is a professional habit.
Composition Catastrophes: Framing the Shot Incorrectly
A technically perfect photo can still be boring if it’s poorly composed. These common framing errors can rob your images of their impact.
Mistake 4: The Centered Subject and Tilted Horizon
Many beginners instinctively place their subject directly in the center of the frame for every shot. This can feel static and predictable. Compounding this is the all-too-common crooked horizon line which makes the viewer feel off-balance and is a major distraction.
The Solution: Use the Rule of Thirds and Level Up Turn on the grid display in your camera or smartphone. This divides your screen into a 3×3 grid. Instead of centering your subject place them along one of the vertical lines or at an intersection point. This creates a more dynamic and visually pleasing composition. Use the horizontal gridlines to ensure your horizon is perfectly straight. It’s a simple fix that makes your photos look instantly more professional.
Mistake 5: Forgetting to Show Scale
The Arabian desert is immense but photos of sand dunes can often look surprisingly small and insignificant without a point of reference. This is a classic example of desert photography mistakes where the image fails to convey the feeling of being there.
The Solution: Add a Sense of Scale To show how massive the dunes truly are you need to include a familiar object in the frame. A person walking along a dune ridge a camel train in the distance or even your 4×4 vehicle can provide the crucial context that communicates the epic scale of the landscape. This simple addition transforms a plain landscape into a powerful story of human experience in a vast wilderness.
Mistake 6: Lacking a Clear Focal Point
When a photo has too many competing elements the viewer’s eye doesn’t know where to look. The image feels cluttered and chaotic lacking a central theme or subject. This is a common issue when trying to capture the “everything” of a busy camp scene or a wide landscape.
The Solution: Simplify and Lead the Eye Great photographs almost always have one clear subject. Before you press the shutter ask yourself “What is this photo about?”. Is it the camel the sunset the pattern in the sand? Frame your shot to make that subject the hero. Use “leading lines”—natural lines within the scene like the crest of a dune footprints in the sand or a fence—to guide the viewer’s eye directly to your focal point.
Technical Traps: Incorrect Camera Settings
Getting out of Auto mode is the first step to creative control but it also opens the door to a new world of potential errors.
Mistake 7: Staying in Full Auto Mode
While convenient Auto mode often struggles with the high-contrast scenes of a desert safari. It might expose for the bright sky leaving the dunes as a dark silhouette or expose for the sand washing out the beautiful colors of the sunset. Relying on it is one of the most limiting desert photography mistakes.
The Solution: Graduate to a Priority Mode Take a small step into manual control by using Aperture Priority mode (A or Av on your dial). In this mode you choose the aperture (which controls the depth of field or how much of the scene is in focus) and the camera intelligently selects the shutter speed for you. It’s the perfect balance of creative control and convenience for landscape photography.
Mistake 8: Using the Wrong Focus Mode
Nothing ruins a photo faster than missed focus. Using a focus mode designed for static subjects when shooting a moving 4×4 will result in a blurry mess. Conversely using a tracking focus mode for a landscape can cause the focus point to jump around unexpectedly.
The Solution: Match Your Focus Mode to Your Subject Use Single-Point AF (AF-S) for stationary subjects like landscapes portraits or camels at rest. You pick one focus point and it locks on. For moving subjects—dune bashing falconry Tanoura dancers—switch to Continuous AF (AF-C). This mode will continuously track the subject and adjust focus as long as you half-press the shutter.
Mistake 9: Neglecting White Balance
White Balance (WB) controls the color temperature of your photos. Left on Auto WB your camera can get confused by the intense orange light of a sunset and try to “correct” it making it look dull and neutral effectively ruining the beautiful warm glow.
The Solution: Take Control of Your Colors To enhance the warm tones of the golden hour switch your WB preset to “Cloudy” or “Shade”. These settings are designed for cooler light and will add a pleasing warmth to your desert shots. For the ultimate control shoot in RAW format which allows you to set the white balance perfectly later during editing without any loss of quality. Avoiding this is key to overcoming desert photography mistakes. A tour with https://royaldesertadventures.ae/ provides ample sunset opportunities to practice this.
Mistake 10: Using On-Camera Flash Incorrectly
The pop-up flash on your camera is one of the worst light sources imaginable. It creates a harsh direct blast of light that produces red-eye unflattering shadows and completely destroys the beautiful ambient atmosphere of the Bedouin camp at night.
The Solution: Capture the Natural Ambiance Turn your pop-up flash off. To shoot in the low light of the camp you need to gather more natural light. Use a “fast” lens (one with a wide aperture like f/1.8) and increase your camera’s ISO setting. This will make your sensor more sensitive to the existing light from the lanterns and campfire preserving the magical mood of the evening.
Post-Processing Pitfalls: Editing Errors
Editing is where you polish your images but it’s also where many well-shot photos are ruined by overzealous adjustments.
Mistake 11: Oversaturating the Colors
It’s tempting to slide that “Saturation” bar all the way to the right to make the sunset colors pop. This is a huge mistake that leads to radioactive-looking oranges blotchy color transitions and an overall fake and amateurish appearance.
The Solution: Use Vibrance for a Subtle Touch Most editing software has a “Vibrance” slider as well as a “Saturation” slider. Vibrance is more intelligent; it primarily boosts the more muted colors in your image while leaving already-saturated colors alone. It produces a much more natural and pleasing result. A little goes a long way.
Mistake 12: Cropping Too Aggressively
While cropping can improve a composition relying on it too much means you are throwing away valuable pixels and reducing the overall quality of your image. A heavily cropped photo may look fine on a small phone screen but will look blurry and pixelated if you ever try to print it.
The Solution: Get the Composition Right In-Camera Make a conscious effort to frame your shot perfectly before you press the shutter. Take an extra moment to check your edges for distracting elements and ensure your subject is positioned well. This discipline will not only save you time in editing but will also result in higher-quality final images.
The Human Element: Posing and Interaction Missteps
Mistake 13: Stiff and Awkward Poses
The classic “stand there look at the camera and smile” photo is a staple of holiday albums but it rarely captures the spirit of adventure. Stiff forced poses look out of place against the wild untamed backdrop of the desert.
The Solution: Encourage Action and Interaction The best portraits tell a story. Instead of static poses direct your subjects to perform an action. Have them walk along the crest of a dune creating a beautiful silhouette. Ask them to look out at the vast landscape instead of at the camera. Capture candid moments of laughter during the camel ride. These interactive and dynamic shots feel far more authentic and compelling. Exploring experiences from providers like https://dubaidesertsafarie.com/ or https://hafiztourism.com/ can offer many such candid opportunities.
By learning to recognize and correct these common desert photography mistakes you will fundamentally elevate the quality of your work. Your photos will begin to reflect the true majesty and emotion of your desert safari experience turning fleeting moments into timeless works of art.
Frequently Asked Questions (FAQs)
1. My sunset photos look hazy and lack contrast. What am I doing wrong?
This is a common issue and it’s often caused by shooting directly into the sun without the right tools. The haziness is lens flare. The solution is twofold: first use a lens hood which is designed to block stray light. Second a Circular Polarizer (CPL) filter is essential. It cuts through atmospheric haze and dramatically increases contrast and color saturation giving you that deep rich sunset look.
2. Why are my action shots of dune bashing always blurry?
Blurry action shots are almost always a result of a shutter speed that is too slow to freeze the motion. This is a critical technical desert photography mistakes. In your camera’s settings choose Shutter Priority mode (S or Tv) and set a fast shutter speed like 1/1000th of a second or even faster. This will ensure the fast-moving 4×4 and the spraying sand are captured in crisp sharp detail.
3. How do I prevent my photos from looking flat and one-dimensional?
Flatness comes from a lack of shadows and depth. The biggest cause is shooting in the middle of the day. The solution is to shoot during the golden hour when the low-angle sun creates long shadows that define the shape and texture of the dunes. Also look for “S” curves in the dune ridges to use as leading lines which create a powerful sense of depth and pull the viewer into the image.
4. What is the biggest white balance mistake people make during the golden hour?
The biggest mistake is leaving the White Balance (WB) on “Auto”. The camera sees the intense orange light and tries to “neutralize” it thinking it’s an error. This sucks the warmth right out of your beautiful sunset. The solution is to manually set your WB to a “Cloudy” or “Shade” preset which will preserve and even enhance those beautiful golden tones.
5. My portraits in the desert have harsh shadows on the face. How do I fix this?
This is caused by direct overhead sunlight. The solution is to find a patch of open shade. The side of a 4×4 or a tent at the camp can provide soft even light that is much more flattering for portraits. If there is no shade position your subject so the sun is behind them (backlighting) and use your camera’s exposure compensation to slightly overexpose the shot ensuring their face is properly lit.
6. I used a wide-angle lens but the dunes still don’t look grand. Why?
A wide-angle lens can sometimes push the background further away making it feel smaller. The mistake is not including a foreground element. To fix this get low to the ground and find something interesting in the foreground—ripples in the sand a small plant your own footprints. This creates layers in your photo (foreground midground background) which enhances the sense of depth and scale.
7. Why do my night photos at the camp look so grainy and noisy?
Grainy photos (digital noise) are caused by using a very high ISO setting. While a high ISO is necessary for low light the mistake is often relying on a “slow” kit lens with a narrow aperture (like f/5.6). The solution is to use a “fast” prime lens (e.g. 50mm f/1.8). Its wide aperture lets in much more light so you can use a lower ISO resulting in cleaner less noisy images.
8. Is it a mistake to use my smartphone for a desert safari?
No it is not a mistake to use a smartphone—they are incredibly powerful. The mistake is not using it to its full potential. Learn to use its advanced features. Manually tap on the screen to set focus and exposure. Use Portrait mode for professional-looking shots of people. Use the gridlines for better composition. A smartphone used skillfully can outperform a dedicated camera used poorly.
9. I tried to take a silhouette photo but my subject is not completely black. What went wrong?
This happens when the camera’s meter tries to find a balance between the bright sky and your dark subject. This is one of the most common desert photography mistakes for beginners. The solution is to use your camera’s “Spot Metering” mode. Aim your focus point directly at the brightest part of the sky which tells the camera to expose for the highlights. This will force your subject into a deep black silhouette.
10. My photos of the Tanoura dancer are just a blurry mess. What’s the technique?
The mistake is using either a shutter speed that is too fast (which freezes the motion completely making it look static) or too slow (which turns everything into an unrecognizable blur). The solution is a technique called “panning”. Use Shutter Priority mode (S or Tv) and select a slower shutter speed like 1/15s. As the dancer spins pan your camera smoothly to follow their movement. The dancer will be relatively sharp while the background blurs creating a fantastic sense of motion.
11. I took photos of camels but they look small and uninteresting. How can I improve this?
A common mistake is shooting camels from a standing height from far away. To make them look more majestic and interesting get low to the ground. Shooting from a lower angle makes the animal seem larger and more heroic. Also focus on details—a close-up of their long eyelashes the texture of their harness or their amusing facial expressions can often be more compelling than a full-body shot.
12. All my desert photos have the same boring orange color. How do I add variety?
This comes from shooting everything at the same time of day. The solution is to shoot through the entire sunset transition. Start during the golden hour for warm orange tones. Continue shooting after the sun has set during the “blue hour” when the sky turns a deep rich blue and the landscape is bathed in soft cool light. This adds a completely different color palette and mood to your collection.
13. Is it a mistake to not edit my photos?
In the digital age yes it is a mistake to not do at least some basic editing. A RAW file from a camera is like an undeveloped film negative; it’s meant to be processed. The solution doesn’t require complex software. Even simple adjustments in a free mobile app—like increasing contrast straightening the horizon and boosting vibrance—can dramatically improve your photos and bring them to life.
14. I’m overwhelmed by all the buttons on my camera. What’s the most common “unnecessary button” mistake?
The most common mistake is fiddling with things like “Picture Styles” or “Creative Filters” in-camera. These settings only affect JPEG files and can’t be undone. The solution is to ignore them completely. Shoot in RAW format and focus only on the three essential settings: Aperture Shutter Speed and ISO. You can add any creative color effects you want later during editing with far more control.
15. Why do all my photos have a distracting bright spot or streak of light?
That is lens flare caused by the sun shining directly on your lens. The mistake is not using a lens hood. A lens hood is the plastic or metal attachment that shades the front of your lens. Using it is the primary solution. Additionally try to compose your shot so the sun is slightly out of the frame or partially hidden behind a dune or a person.
16. I can’t seem to get a sharp focus on the falcon during the falconry show. Why?
The falcon moves incredibly fast. The mistake is likely using the wrong autofocus mode and area. The solution is to switch your camera to Continuous Autofocus (AF-C) and use a “Dynamic Area” or “Zone AF” setting. This allows the camera to use a cluster of focus points to track the bird as it moves making it much more likely that you’ll nail a sharp shot.
17. My photos of the starry night sky are just black. What did I do wrong?
Night sky photography requires a very specific technique. The mistakes are likely using autofocus (it won’t work in the dark) and too short of a shutter speed. The solution: put your camera on a tripod. Manually focus your lens to infinity. Set your aperture to its widest setting (e.g. f/2.8). Set your shutter speed to 15-25 seconds and your ISO to around 1600-3200. This will allow your camera to gather enough light to reveal the stars.
18. I tried taking a “sand in hand” photo but it looks clumsy. What’s the secret?
The mistake is often poor lighting and a distracting background. The solution is to take this shot during the golden hour when the light is soft. Use your camera’s Portrait mode or a wide aperture on a dedicated camera to blur the background focusing all the attention on the hand and the sand. A little bit of slow-motion video of the sand falling can be even more effective.
19. Why does the sand in my photos sometimes look yellow and other times red?
This isn’t a mistake but a function of the time of day! The solution is to understand the light. In the late afternoon the sand will look more golden or yellow. As the sun gets very close to the horizon the light becomes much warmer and redder casting a deep orange or reddish glow on the dunes. This is the “magic hour” that photographers seek out.
20. What is the single most impactful way to avoid desert photography mistakes?
The single most impactful solution is to slow down. The biggest mistake is rushing. Instead of frantically snapping away at everything take a moment before each shot. Check your horizon. Look at your background. Think about your focal point. Ask yourself what story you are trying to tell. A few moments of deliberate thought will do more to improve your photography than any piece of gear you can buy.


Nice answers in return of this matter with real arguments and telling everytghing
on the topic of that.