Cosmic Sands: 10 Secrets to Mastering Overnight Desert Astrophotography
When the sun dips below the horizon on an overnight desert safari the adventure is far from over. A new world awakens above—a breathtaking canopy of stars dust lanes of the Milky Way and celestial wonders invisible from the light-polluted corridors of the city. This is the ultimate prize for the adventurous photographer: the chance to practice the profound and rewarding art of overnight desert astrophotography. Capturing this cosmic spectacle however requires more than just pointing your camera at the sky.
This guide is your comprehensive map to the stars. We will demystify the techniques and reveal the secrets that transform a black sky with a few faint dots into a vibrant detailed portrait of the cosmos. Forget the idea that this is a genre reserved for professionals with astronomical equipment. With the right knowledge planning and the camera you likely already own you can create stunning images of the night sky. Mastering overnight desert astrophotography is a journey of patience and precision but the breathtaking results are an experience that will stay with you forever.
Why the Arabian Desert is an Astrophotographer’s Dream
To capture great photos of the night sky you need two things above all else: clear skies and dark skies. The Arabian desert outside of Dubai offers both in abundance making it a world-class destination for this type of photography.
Escaping the Veil of Light Pollution
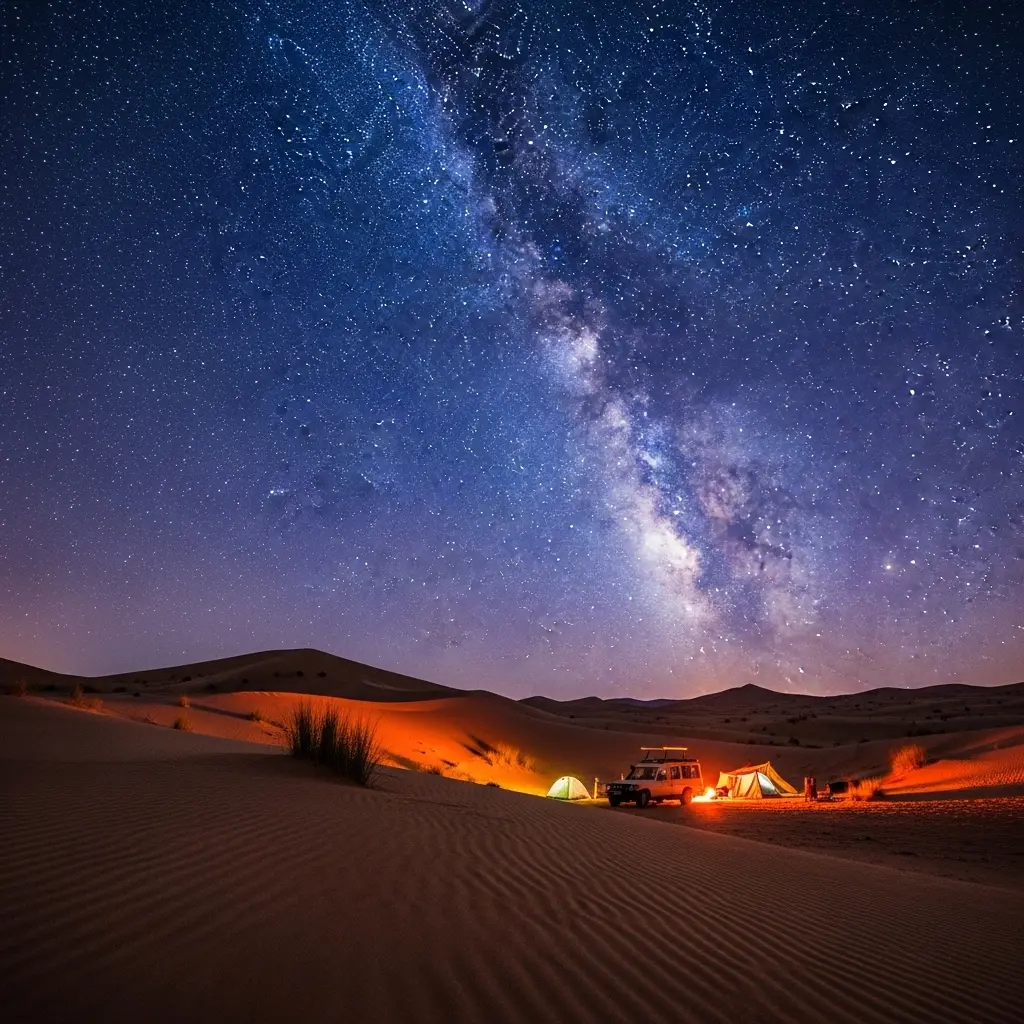
Light pollution is the nemesis of the astrophotographer. The ambient glow from streetlights buildings and cars creates a luminous haze that washes out all but the brightest stars from view. A quality overnight desert safari takes you far away from this urban glare into designated conservation areas where the darkness is profound. This pristine darkness allows your camera’s sensor to pick up the faint light from distant stars and the magnificent core of our Milky Way galaxy.
The Advantage of a Dry Atmosphere
The desert air is incredibly dry with very low humidity. Moisture in the atmosphere can scatter light and reduce clarity making stars appear softer and less defined. The dry desert air on a clear night is exceptionally transparent providing a crystal-clear window into the universe. This results in sharper stars more visible detail and better contrast in your final images a key factor for successful overnight desert astrophotography.
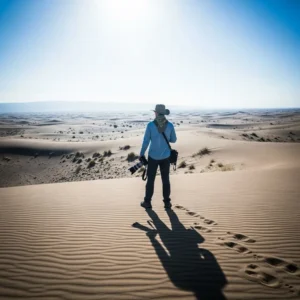
Unforgettable Foreground Elements
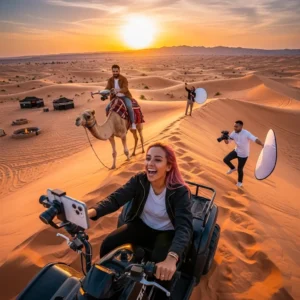
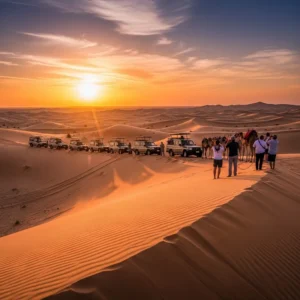
What elevates a good photo of the stars to a great one is a compelling foreground. Astrophotography without context can feel detached. The desert provides a wealth of powerful silhouettes to anchor your cosmic shots. Imagine the majestic arc of the Milky Way rising above the serene curve of a golden sand dune a lone camel resting under the stars or the warm glow of a distant Bedouin tent. These elements add a sense of place and scale turning your image into a complete story.
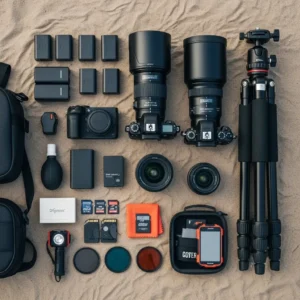
Gearing Up: The Essential Astrophotography Kit
While the location is perfect the right equipment is what makes capturing the night sky possible. You don’t need a space telescope but a few key pieces of gear are non-negotiable for overnight desert astrophotography.
The Camera: Full-Frame vs. Crop Sensor
The ideal camera for astrophotography is one that performs well in low light. This generally means a camera with a larger sensor. Full-frame cameras have a significant advantage here as their larger sensors can gather more light resulting in cleaner images with less digital noise at the high ISO settings required for night photography. However modern APS-C (crop sensor) cameras are also very capable. The key is to have a camera that allows full manual control.
The Lens: The Fast and Wide Imperative
This is the most important piece of gear in your bag. The perfect astrophotography lens has two defining characteristics: it is “wide” and it is “fast”.
- Wide: A wide-angle lens (in the 14-24mm focal range) allows you to capture a massive portion of the sky and include some of the landscape for context.
- Fast: A “fast” lens has a very wide maximum aperture (e.g. f/1.4 f/1.8 or f/2.8). A wider aperture lets in significantly more light allowing you to use a lower ISO for cleaner images. A kit lens with a maximum aperture of f/4 or f/5.6 will struggle immensely in the dark.
The Tripod: The Unshakable Foundation
Since you will be using long shutter speeds (often 15-30 seconds) your camera must remain perfectly still. Even the slightest vibration will turn stars into blurry streaks. A flimsy lightweight tripod will be susceptible to desert winds. You need a sturdy and stable tripod to ensure your images are tack-sharp. This is a foundational piece of overnight desert astrophotography gear.
The Shutter Release: Hands-Off Control
Simply pressing the shutter button on your camera with your finger can introduce enough vibration to blur your image. To avoid this you need a way to trigger the camera remotely. A simple cable release or an wireless remote is a great option. Even more versatile is an intervalometer which allows you to program a series of photos a key tool for creating time-lapses or star trails.
The Light Source: A Headlamp with Red Light Mode
You will be operating your camera in complete darkness. A headlamp is essential for keeping your hands free. However a bright white light will ruin your night vision which takes up to 30 minutes to fully adapt to the dark. The solution is a headlamp that has a red light mode. Red light does not affect your night vision allowing you to see your camera settings without repeatedly blinding yourself.
The Planning Phase: Setting Yourself Up for Success
The best night sky photos are made long before you head out into the desert. Meticulous planning is what separates the lucky snapshots from the breathtaking masterpieces.
Timing Your Trip: The Lunar Calendar is Key
The moon is the brightest object in the night sky. A full moon acts like a giant lightbulb washing out the Milky Way and all but the brightest stars. The absolute best time for overnight desert astrophotography is during the New Moon phase when the moon is not visible in the sky. The week leading up to and following the New Moon also offers sufficiently dark skies.
Locating the Main Attraction: Finding the Milky Way
The Milky Way isn’t just “up there”; its position changes throughout the night and the year. You need to know where and when it will rise. Powerful yet user-friendly smartphone apps like PhotoPills Stellarium and Star Walk are essential planning tools. They use augmented reality to show you the exact position of the Milky Way core at any given time allowing you to plan your composition with precision.
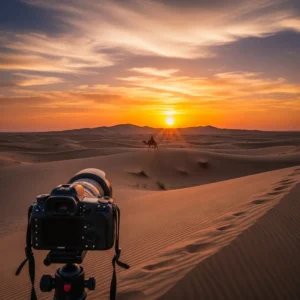
Scouting Your Location Before Dark
Do not wait until it’s pitch black to find your shooting spot. Arrive at your campsite with a quality tour operator like https://royaldesertadventures.ae/ during the golden hour and use that time to scout. Walk around and find a compelling foreground—an interesting dune shape a lone tree etc. Make a mental note of its position relative to where the Milky Way will rise. This preparation is a hallmark of successful overnight desert astrophotography.
The “500 Rule” and Beyond: Nailing Your Camera Settings
This is the technical heart of the process. You must use full Manual Mode (M) on your camera.
Step 1: Manual Mode is Non-Negotiable
In the dark your camera’s automatic modes have no idea what to do. They will fail 100% of the time. Turn your mode dial to ‘M’ to take full control over the aperture shutter speed and ISO.
Step 2: Setting Your Aperture
Your goal is to let in as much light as possible. Set your lens to its widest possible aperture (the lowest f-number). This will be f/2.8 f/1.8 or similar depending on your lens.
Step 3: Calculating Your Shutter Speed (The 500 Rule)
Because the Earth is rotating stars will appear to move across the sky. If your shutter speed is too long they will streak and look like lines instead of pinpoints. The “500 Rule” is a simple formula to calculate the maximum shutter speed you can use before this happens. Formula: 500 / Your Lens’s Focal Length = Max Shutter Speed in Seconds.
- Example with a 20mm lens on a Full-Frame camera: 500 / 20 = 25 seconds.
- For Crop Sensor (APS-C) cameras you must first multiply the focal length by 1.5: 500 / (20mm x 1.5) = 16.6 seconds.
Step 4: Dialing in the ISO
ISO controls the sensor’s sensitivity to light. For astrophotography you will need to use a high ISO. A good starting point is typically between ISO 1600 and ISO 6400. Take a test shot at ISO 3200. If it’s too dark increase the ISO. If the stars are blown out and too bright decrease it.
Step 5: Mastering Manual Focus
Autofocus will not work in the dark. You must focus manually. Switch your lens to Manual Focus (MF). Turn on your camera’s Live View screen. Find the brightest star or planet in the sky and use the camera’s digital zoom to magnify it on the screen. Now carefully turn your lens’s focus ring back and forth until that star is as small and sharp as a tiny pinpoint. This is the most critical step for sharp photos.
Advanced Techniques for Breathtaking Results
Once you’ve mastered the basics you can introduce more advanced techniques to elevate your overnight desert astrophotography.
Light Painting the Foreground
A long exposure of the sky will often leave your foreground as a dark featureless silhouette. To fix this you can use a technique called “light painting.” During your 25-second exposure use a very weak light source (like a headlamp on its dimmest setting or even your phone screen) and quickly “paint” or sweep the light across the foreground elements like the sand dunes or a camel. This will gently illuminate them making them visible in the final photo.
Creating Star Trails
Instead of avoiding star streaks you can embrace them to create a spectacular image showing the Earth’s rotation. This requires an intervalometer. Set your camera to take a continuous series of long exposures (e.g. 100 photos at 30 seconds each). Later you can use free software like StarStax to merge all these individual photos into one single image with beautiful concentric star trails.
The Art of the Composite Image
For the ultimate quality professional photographers often create composite images. This involves “time blending”. They will take a photo of the foreground during the “blue hour” (just after sunset) when there is still soft ambient light revealing all its detail. They will then leave their tripod in the exact same spot and take their sky photos an hour later when it’s completely dark. In post-processing software like Photoshop they will blend the perfectly lit foreground with the perfectly captured sky.
Choosing the Right Safari
Not all overnight safaris are equal. For successful overnight desert astrophotography you must choose a tour that takes you to a camp located deep within a conservation reserve far from any highway or town glow. Research tour operators like https://dubaidesertsafarie.com/ or https://hafiztourism.com/ to inquire about the specific location of their camps and their suitability for dark sky viewing. A truly remote camp is the first and most important step.
The journey of overnight desert astrophotography is as magical as the destination. It connects you to the desert and the cosmos in a profound way. It demands patience and rewards it with images that are literally out of this world.
Frequently Asked Questions (FAQs)
1. What is the difference between the “500 Rule” and the more complex “NPF Rule”?
The 500 Rule is a simple and effective guideline for beginners. The NPF Rule is a more complex and accurate formula that takes into account your camera’s sensor size and aperture as well as focal length. It generally gives a slightly shorter shutter speed than the 500 Rule resulting in marginally sharper stars. For beginners sticking to the 500 Rule is perfectly fine.
2. My lens is fogging up in the cool desert night. How do I prevent this?
Lens condensation is a common problem. It happens when the glass of your lens cools down to the dew point. The best solution is a dedicated lens warmer—a small strap that wraps around your lens and is powered by a USB power bank. It provides a tiny amount of heat to keep the glass just above the dew point preventing fog from forming.
3. Can I do astrophotography with my 18-55mm kit lens?
It is challenging but not impossible. Your kit lens is not very wide or fast. You’ll need to use the 18mm end. Your aperture will likely be limited to f/3.5 which is not ideal. You will have to push your ISO much higher (ISO 6400 or more) which will result in a noisy image. You can capture the stars but you won’t get the clean detailed results of a dedicated fast wide-angle lens.
4. What is the best free app for finding the Milky Way?
Stellarium Web and the free version of Star Walk are both excellent options. They provide a detailed map of the night sky for your location allowing you to see exactly where the constellations and the Milky Way will be at any given time. They are invaluable tools for planning your overnight desert astrophotography shoot.
5. How do I reduce the digital noise (grain) in my high-ISO photos?
There are two main ways. First technique is “in-camera noise reduction” which most cameras have. The best method is during post-processing. Modern software like Adobe Lightroom has powerful AI-driven noise reduction tools that can effectively remove noise while preserving detail. Another advanced technique is “stacking” where you take multiple identical photos and use software to average them which significantly reduces random noise.
6. Is a full-frame camera really that much better for astrophotography?
For this specific genre yes. A full-frame sensor’s larger pixels are more sensitive to light. This means at the same high ISO (e.g. 3200) a full-frame camera will produce a much cleaner image with less noise and better color detail than a crop-sensor camera. While you can still get great results with a crop-sensor the quality ceiling is simply higher with full-frame.
7. How do I find infinity focus on my lens in the dark?
Do not trust the infinity symbol (∞) on your lens’s distance scale; it’s often not perfectly accurate. The only reliable method is to use your camera’s Live View screen. Point at the brightest star magnify it as much as possible and manually turn the focus ring until the star is a tiny sharp point. It’s a good idea to secure the focus ring with a small piece of gaffer tape once you’ve found it.
8. What is the best season to see the Milky Way core in Dubai?
The galactic core of the Milky Way which is the brightest and most spectacular part is best viewed from the Northern Hemisphere between March and October. During the summer months it is visible for a longer portion of the night. Planning your overnight desert astrophotography trip during these months gives you the best chance to capture it.
9. Can I capture the colors of the Milky Way as I see them in photos?
No our eyes are not sensitive enough to see the vibrant colors of the nebulae within the Milky Way. To the naked eye it will appear as a faint silvery cloud. Your camera’s long exposure is what allows you to collect enough light data to reveal the amazing yellows pinks and purples that are hidden within our galaxy.
10. What is “Long Exposure Noise Reduction” in my camera menu and should I use it?
This is a setting where after your main photo is taken (e.g. 30 seconds) the camera takes a second “dark frame” exposure for the same duration with the shutter closed. It then subtracts the noise from the dark frame from your actual photo. It works well but it doubles your shooting time (a 30-second shot takes 60 seconds). Many photographers prefer to turn it off and handle noise in post-processing.
11. Why do I need a red light headlamp specifically?
Human eyes have two types of photoreceptors: rods and cones. Cones see color but rods are responsible for our night vision. Rods are not sensitive to red light. So using a red light allows you to see your surroundings and camera settings without de-activating your rods meaning you preserve your crucial adaptation to the darkness.
12. I did everything right but my photos are still a bit blurry. What could be the cause?
If your stars look like tiny lines instead of dots your shutter speed is too long. If the whole image is soft your focus is off. If it’s blurry in a random way it’s likely vibration. Ensure your tripod is on stable ground (not soft sand that can shift). Hang your camera bag from the tripod’s center column for added stability and always use a remote shutter.
13. What is the “blue hour” and how does it relate to astrophotography?
The blue hour is the period of twilight just after sunset (or before sunrise) when the sun is below the horizon and the sky is a deep rich blue. It’s too bright for stars but it’s the perfect time to capture a well-lit detailed photo of your foreground (the dunes). This is the shot you would use for the “foreground” part of an advanced time-blending composite.
14. Can I use my smartphone for astrophotography?
The latest high-end smartphones (like recent iPhones and Google Pixels) have dedicated “Astrophotography” or “Night” modes that can take surprisingly good photos of the stars when held perfectly still on a tripod. They won’t match the quality of a dedicated camera and fast lens but they are a fantastic and accessible entry point into the hobby.
15. How do I create a time-lapse of the stars moving?
You need an intervalometer. Set your camera on a tripod and program the intervalometer to take hundreds of photos one after another with a short 1-2 second gap between each shot. For example take 300 photos each with a 25-second exposure. Later you can import this sequence of images into a video editing program to create a stunning time-lapse video.
16. What’s the best way to compose a shot with the Milky Way?
Think about balance and flow. The Milky Way is a powerful diagonal line. Try to position a foreground element like a tent or a camel in the opposite corner of the frame to create a pleasing visual balance. You can also use the curve of a sand dune as a leading line that points up towards the Milky Way guiding the viewer’s eye through the scene.
17. Do I need any special filters for my lens?
For basic overnight desert astrophotography you do not need filters. In fact you should remove any filters like a UV or CPL filter as the extra glass can sometimes cause unwanted reflections or aberrations. There are specialized “light pollution” filters but these are not necessary in a truly dark desert location.
18. What is “coma” in a lens and why is it bad for astrophotography?
Coma (or comatic aberration) is a lens flaw where stars especially in the corners of the frame appear distorted looking like small seagulls or triangles instead of sharp pinpoints. High-quality wide-angle lenses are specifically designed to minimize coma. Cheaper lenses often suffer from it more.
19. How do I keep myself comfortable during a long night of shooting?
Even in the desert it can get surprisingly cold at night. Dress in layers. Bring a warm hat and gloves. Pack snacks and plenty of water. A comfortable folding chair can make the long waits between exposures much more pleasant. Being comfortable allows you to stay out longer and focus on your creativity.
20. What is the most important tip for a beginner in overnight desert astrophotography?
Practice before you go. Don’t wait until your expensive desert safari to try these techniques for the first time. Go to a dark local park on a clear night and practice finding manual focus setting your exposure and taking test shots. Making your mistakes at home means you’ll be confident and ready when you’re under the magnificent desert sky.