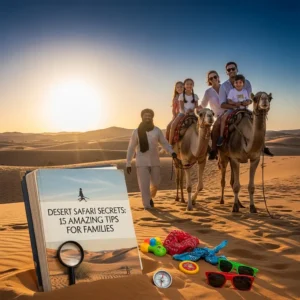
Desert Safari Photography: 7 Powerful Secrets to Capturing an Incredible Desert Photo
The desert is one of the world’s most dramatic and challenging environments for a photographer. The vast, sweeping sandscapes offer unparalleled beauty.
However, the extreme light, moving subjects, and fine dust pose major hurdles. This comprehensive guide will equip you with the knowledge to master Desert Safari Photography.
We will cover everything from gear preparation to advanced post-processing. Mastering these techniques ensures you capture truly stunning Arabian Desert Pictures.
1. The Foundation: Essential Safari Photography Gear and Preparation
Successful Desert Safari Photography starts long before you reach the dunes. Proper gear selection and dust mitigation are non-negotiable steps.
H3: Protecting Your Safari Photography Gear
The biggest threat to your equipment is the fine desert dust. This abrasive powder can destroy lenses and camera sensors quickly.
Use zip-top plastic bags to seal your camera when not actively shooting. Change lenses inside your vehicle or a dust-free area.
Carry a rubber blower (not canned air) to gently remove dust from the lens surface. Never wipe the lens aggressively with a cloth.
H3: Lens Selection for Stunning Desert Safari Photography
You need two types of lenses for comprehensive Desert Safari Photography. A wide-angle lens (16–35mm) captures the grand scale of the dunes.
The wide view is essential for vast Arabian Desert Pictures and dramatic Desert Night Sky Photos. It emphasizes the tiny scale of people against the towering sand.
A telephoto lens (70–200mm) is crucial for isolating subjects. It compresses the distance between the dunes, making the layers look closer.
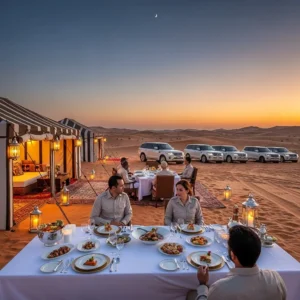
This compression is perfect for close-up Camel Ride Photography and detailed portraits at the desert camp.
H3: The Crucial Accessories Checklist
A lightweight tripod is mandatory for capturing sharp Desert Night Sky Photos. It also aids in steady Golden Hour Photography.
Bring extra batteries; the heat can drain them faster than normal. Carry a small, dark cloth to use for wiping sweat and dust off your hands, not your lens.
A polarizing filter can help enhance the blue in the sky during the day. It also reduces glare off the sand, improving overall image quality.
This preparation guarantees your Safari Photography Gear is ready for the unique conditions.
2. The Golden Secret: Timing Your Desert Safari Photography
The light in the desert is unforgivingly harsh in the middle of the day. The sun is directly overhead, creating flat, uninteresting light and harsh shadows.
The best time for Desert Safari Photography is always during the “Golden Hour” and “Blue Hour.”
H3: Mastering Golden Hour Photography
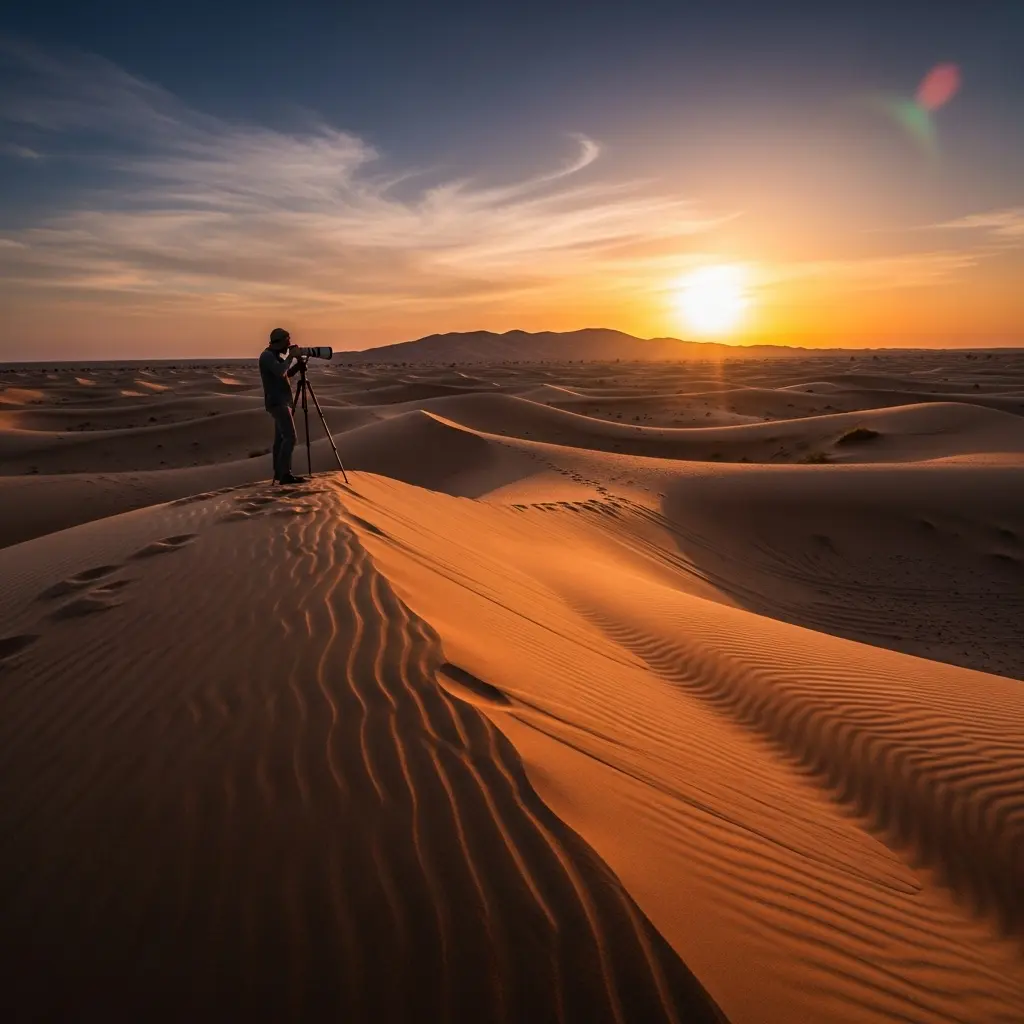
The Golden Hour Photography window occurs about one hour after sunrise and one hour before sunset. This light is soft, warm, and highly directional.
It dramatically enhances the texture of the sand dunes. The long shadows define the ridges and contours of the landscape.
For Sunset Photography Dubai, set up 30 minutes before the actual sunset time. This captures the best colors as the light fades.
Shoot quickly during this time; the perfect light often lasts only 15 to 20 minutes.
H3: The Blue Hour and Desert Night Sky Photos
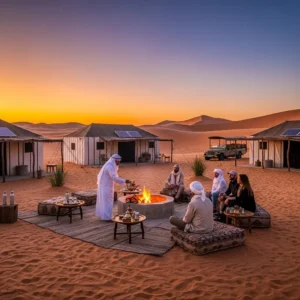
The Blue Hour is the time immediately after sunset, when the sky deepens to a rich cobalt color. This is perfect for silhouettes against the horizon.
Immediately after the Blue Hour, you can start setting up for Desert Night Sky Photos. These stunning shots are a highlight of Desert Safari Photography.
To get the best results, ensure your Safari Photography Gear includes a fast lens (f/2.8 or wider) and a stable tripod.
This precise timing is one of the most effective Desert Photo Tips for professional-grade results.
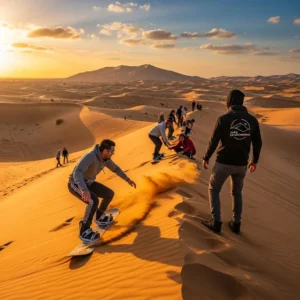
3. Action and Motion: Capturing Dune Bashing Photos and Camel Ride Photography
The desert safari is dynamic, full of fast-moving vehicles and rhythmic camel treks. Capturing this motion requires specific camera settings.
H3: Freezing Motion for Stunning Dune Bashing Photos
Dune Bashing Photos are about speed and drama. You need a fast shutter speed to freeze the action and the spray of sand.
Set your camera to Shutter Priority (S or Tv mode). Start with a shutter speed of at least 1/1000th of a second.
This fast shutter ensures the vehicle and the flying sand are sharply defined. It captures the high-energy excitement of the moment.
Increase your ISO if necessary to maintain this fast speed, especially on cloudy days.
H3: Showing Movement in Camel Ride Photography
For Camel Ride Photography, you might want to blur the movement slightly to convey motion and rhythm.
Use a technique called “panning.” Set your shutter speed to a slower speed, such as 1/60th or 1/125th of a second.
Follow the moving camel smoothly with your camera as you press the shutter. The camel will be relatively sharp, but the background will be blurred.
This creative technique adds artistic flair to your Arabian Desert Pictures.
H4: Focus Technique for Action Shots
Always use Continuous Autofocus (AF-C or Servo mode) when capturing Dune Bashing Photos. This allows the camera to track the fast-approaching vehicle.
Keep your focus point locked onto the front of the vehicle. This ensures the most important part of the Desert Safari Photography composition is sharp.
4. Composition Rules for Landscape Desert Safari Photography
The vastness of the desert can make composition difficult. You need techniques to manage the scale and guide the viewer’s eye.
H3: Using the Rule of Thirds
The Rule of Thirds is a foundational principle in all Desert Photo Tips. Divide your frame into nine equal sections with two horizontal and two vertical lines.
Place your key elements—the horizon, a lone camel, or a distant dune—along these lines or at their intersections.
Avoid placing the horizon line directly in the middle of the frame. Move it up for more sand, or down for more sky.
H3: Incorporating Leading Lines
Leading lines are crucial in Desert Safari Photography. They draw the viewer into the frame and emphasize depth.
Look for natural lines created by the sharp crests of the sand dunes. The long shadows created during Golden Hour Photography also act as powerful leading lines.
These lines help manage the immense scale of the Arabian Desert Pictures by guiding the eye to a specific focal point.
H4: Adding Human Scale
The best Desert Safari Photography often includes a human element. A lone figure or a small group emphasizes the monumental size of the sand.
Place the person far away, often at the intersection of a third, facing the vast expanse. This technique instantly elevates the narrative of your desert photo.
Look for opportunities during Camel Ride Photography or while guests are sandboarding.
5. Specialized Techniques: Desert Night Sky Photos and Silhouettes
The dark skies in the desert offer unique Desert Safari Photography opportunities. You can capture both star trails and striking silhouettes.
H3: Settings for Desert Night Sky Photos
To capture the stars, you need a high ISO, wide aperture, and long exposure.
-
Aperture: f/2.8 or the widest available on your lens.
-
Shutter Speed: Use the ‘500 Rule’ (500 divided by your focal length). For a 20mm lens, 500/20 = 25 seconds. Do not exceed this to Avoid Star Trails.
-
ISO: Start at 3200 and adjust up or down based on your camera’s noise performance.
A tripod is absolutely essential for these long exposures. Focus manually to infinity using the largest, brightest star as your target.
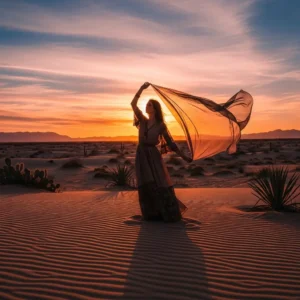
H3: Creating Powerful Silhouettes
Silhouettes work best during Sunset Photography Dubai or the Blue Hour. Position your subject directly against the brightest light source (the setting sun).
Ensure your exposure setting is biased towards the bright sky. This forces the foreground subject to remain completely dark.
The silhouette should have a strong, easily recognizable shape, such as a camel train or a figure jumping. Simplicity is key for effective Desert Photo Tips in this style.
6. The Post-Processing Power: Editing Desert Photos
Even the best raw files benefit greatly from proper post-processing. Editing Desert Photos is where you refine the color, contrast, and texture captured during your Desert Safari Photography.
H3: Enhancing Color and Texture
In Lightroom or similar software, focus on enhancing the texture of the sand. Boost the ‘Clarity’ and ‘Texture’ sliders slightly, but avoid over-processing.
For Golden Hour Photography, increase the ‘Warmth’ (temperature) to intensify the golden and orange hues. Add a slight saturation boost to the sky.
Be careful not to introduce too much digital noise, especially when Editing Desert Photos taken at high ISO.
H3: Noise Reduction for Desert Night Sky Photos
Desert Night Sky Photos taken at high ISO will always have noise. Use the ‘Noise Reduction’ slider cautiously.
Too much noise reduction can lead to a soft, plastic look. Balance the noise reduction with the desire to maintain sharp stars.
Perform local adjustments using a brush tool to brighten the foreground or darken the sky selectively. This is an advanced Desert Photo Tips technique.
H4: Final Cropping and Straightening
Always ensure your horizon is perfectly level. Even a slight tilt can ruin an otherwise perfect composition.
Crop your Desert Safari Photography to refine the composition and remove distracting elements. Try both 16:9 for cinematic views and 4:5 for social media.
7. Strategic Planning: Maximizing Your Desert Safari Photography Opportunities
You have limited time in the desert, often only one evening safari. Strategic planning is crucial to maximizing your Desert Safari Photography.
H3: Researching the Location and Light
If possible, check the specific location of the desert camp beforehand. Some camps are better situated for Sunset Photography Dubai than others.
Use a sunrise/sunset app on your phone to know the exact time and angle of the light. Plan your shot list accordingly.
Understanding the terrain helps you secure the Best Vantage Points quickly.
H3: Prioritizing Your Shot List
Create a priority list before you leave:
-
Golden Hour landscape (Wide angle).
-
Dune Bashing Photos (Fast shutter speed).
-
Camel Ride Photography (Telephoto lens).
-
Sunset Silhouette (Exposure for the sky).
-
Desert Night Sky Photos (Tripod setup).
This list ensures you don’t miss the most critical light and action shots.
H4: Using External Resources for Planning
Reputable tour operators like those found at https://hafiztourism.com/ often provide detailed itineraries. Use their schedules to time your photographic opportunities.
For example, knowing when the Camel Ride starts allows you to set up your position for the best light.
Luxury tour providers, accessible via https://royaldesertadventures.ae/, often offer specialized photography safaris with dedicated time slots. This is the premium option for intense Desert Safari Photography focus.
8. Gear Protection and Maintenance Deep Dive
The persistent threat of sand demands constant vigilance for your Safari Photography Gear. This maintenance is key to long-term Desert Photo Tips success.
H3: Lens Changing Protocols
Never change lenses in open air when the wind is blowing. This is the quickest way to get sand on your sensor.
Change lenses while sheltering behind your 4×4 or inside the vehicle. Hold the camera body facing downwards to prevent dust settling on the sensor opening.
Carry a small, dedicated dust-free pouch for storing your spare lenses.
H3: The Importance of Filters
A UV filter acts as a sacrificial layer of glass on your lens. It is cheaper to replace a scratched UV filter than a front lens element.
Keep the filter on at all times during Desert Safari Photography. Use the blower to clean the filter frequently throughout the day.
This simple addition is one of the most cost-effective Safari Photography Gear investments.
9. Advanced Techniques: HDR and Focus Stacking
For capturing the extreme dynamic range of the desert, advanced techniques are necessary. This is crucial for high-quality Arabian Desert Pictures.
H3: Using HDR for Extreme Light
During the day, the difference between the bright sky and the shaded sand is too great for a single exposure. This is called high dynamic range (HDR).
Take three or more photos of the same scene at different exposures (one dark, one middle, one bright). Blend these in post-processing.
This preserves detail in both the highlights and shadows, leading to richer Arabian Desert Pictures.
H3: Focus Stacking for Sharpness
When shooting vast landscapes for Desert Safari Photography, getting sharpness from the foreground sand to the distant horizon is hard.
Shoot two or more photos, focusing on a different point (one near, one far) for each. Blend these photos in Editing Desert Photos software.
This technique ensures everything is perfectly sharp, creating maximum impact for your Desert Photo Tips efforts.
10. Mastering the Sunset Photography Dubai Moment
Sunset Photography Dubai is the star event of any safari. You must be prepared to handle rapidly changing light.
H3: The Pre-Sunset Setup
Set up your tripod at your chosen location at least 45 minutes before sunset. Find a foreground element—a lone bush or a tent—to anchor the photo.
Check the exposure with your meter reading the brightest part of the sky. Then, adjust to ensure the foreground is slightly underexposed for dramatic effect.
This pre-setup allows you to focus purely on the light when the magic begins.
H3: The Post-Sunset Glow
The colors after the sun dips below the horizon are often the most beautiful. The sky turns from orange to pink, then purple.
Continue shooting for 15 to 20 minutes after sunset. Use a longer exposure to capture the subtle remaining light.
This post-sunset glow is often overlooked but provides some of the best Desert Safari Photography results.
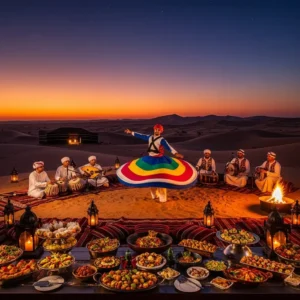
11. Ethical and Respectful Camel Ride Photography
Camel Ride Photography requires sensitivity and respect for the animals and the local culture.
H3: Respecting the Animals
Avoid using a flash directly on the camels. This can startle them and potentially cause a disturbance.
When getting close, ask permission from the handler first. Use the telephoto lens to capture intimate portraits without intrusion.
Capturing the rhythmic line of camels against the dunes is the classic Camel Ride Photography shot.
H3: Cultural Sensitivity
Be respectful when photographing local performers at the camp. Some individuals may not wish to be photographed.
Always ask before taking a close-up portrait. Use your telephoto lens to capture genuine moments from a distance if direct interaction is not possible.
This mindful approach ensures your Desert Photo Tips are culturally sound.
12. Using Creative Angles in Desert Safari Photography
Avoid shooting everything from eye level. Varying your perspective adds massive visual interest to your Arabian Desert Pictures.
H3: Low-Angle Shots
Lie down on the sand to shoot up at the dunes or subjects. This makes the dunes appear much taller and more dramatic.
It emphasizes the verticality of the landscape. Use the wide-angle lens to maximize this effect.
H3: High-Angle Shots
Shoot from the top of a dune looking down into a valley. This provides a great sense of scale and distance.
A high-angle shot is excellent for capturing the winding tracks left by the 4×4 vehicles in your Dune Bashing Photos.
This variation makes your entire portfolio of Desert Safari Photography more engaging.
13. Advanced Editing Desert Photos Techniques
Beyond basic sliders, there are advanced techniques for Editing Desert Photos.
H3: Color Grading
Use color grading tools to shift the shadows to a deep blue (for cool contrast) and the highlights to a warm orange/yellow. This is the Teal and Orange look that works well for desert scenes.
The contrast between the cool shadows and warm highlights makes your Sunset Photography Dubai images pop.
<h4>H4: Localized Adjustments</h4>
Use radial or gradient filters to selectively brighten the subject or darken the sky. This guides the viewer’s eye to the most important element.
Darkening the sky slightly adds drama to your Desert Night Sky Photos.
14. Essential Safari Photography Gear Table
| Gear Item | Purpose in Desert Safari Photography | Key Tip |
| Blower Bulb | Dust removal from lens/sensor | Never use canned air. |
| Wide-Angle Lens | Landscape, scale, Desert Night Sky Photos | Capture the vastness of the scene. |
| Telephoto Lens | Portraits, compressing dunes, Camel Ride Photography | Isolates subjects from the busy background. |
| Tripod | Required for Desert Night Sky Photos, stability | Must be lightweight and stable. |
| UV Filter | Protects the front lens element from sand | Cheaper to replace than a lens. |
15. The Business of Desert Safari Photography
If you are shooting professionally, these Desert Photo Tips become business strategies.
Professional insights can be found by researching established operators like https://dubaidesertsafarie.com/. They show the standard of quality demanded by clients.
For bespoke photo tours, consult services such as https://royaldesertadventures.ae/ to understand the high-end market.
This knowledge turns your technical skills into a marketable service, creating truly memorable Arabian Desert Pictures.
Frequently Asked Questions (FAQs) – Long Answers
1. What is the most crucial camera setting change I need to make before starting Desert Safari Photography, and why?
The most crucial camera setting change for successful Desert Safari Photography is often setting your Exposure Compensation to +1/3 or +2/3 stop. Reasoning: Cameras are designed to expose for a middle-gray tone. The vast expanse of bright sand and sky in the desert often tricks the camera’s meter into thinking the scene is too bright. This causes the camera to underexpose the image, making the sand look dull or gray. By manually dialing in a positive exposure compensation, you ensure the bright sand retains its natural, vibrant light, which is essential for compelling Arabian Desert Pictures.
2. How can I protect my Safari Photography Gear from the fine desert dust during the dune bashing portion of the safari?
Protecting your Safari Photography Gear during dune bashing requires stringent dust management. Protocol: Before the ride begins, place your camera and lenses inside a zip-top plastic bag. Ensure the camera is sealed inside the bag, and the zipper is completely closed. If you must shoot during the dune bashing, only remove the camera briefly, holding it inside the bag until the last possible moment. Crucially: Never change lenses during or immediately after the dune bashing when the air is still filled with sand particles. After the ride, use a non-contact rubber bulb blower to clean the exterior before opening the bag.
3. Explain the ‘500 Rule’ for Desert Night Sky Photos, and how does it prevent unwanted star trails in my images?
The ‘500 Rule’ is a critical formula for Desert Night Sky Photos that dictates the maximum shutter speed you can use before the Earth’s rotation causes the stars to appear as streaks (star trails) instead of points of light. Formula: Divide 500 by your lens’s focal length (in mm). Example: If you use a 20mm lens, 500 / 20 = 25 seconds. This means 25 seconds is the longest exposure time you can use to keep the stars sharp. Adhering to this rule is the single most effective Desert Photo Tips strategy for crisp, high-quality Desert Night Sky Photos.
4. What are the best creative composition techniques for capturing the sheer scale and vastness of the dunes in Desert Safari Photography?
To capture the sheer scale and vastness in Desert Safari Photography, use a combination of leading lines and inclusion of a human element. Technique 1 (Leading Lines): Use a wide-angle lens and place the crest of a dune or a shadow line leading from the bottom corner of your frame up to the center. This guides the viewer’s eye deep into the scene, creating depth. Technique 2 (Human Element): Place a small, lone figure, a camel, or a distant 4×4 vehicle against the huge backdrop of the sand. This contrast immediately establishes the monumental scale of the dunes, which is key for dramatic Arabian Desert Pictures.
5. What specific Lightroom or photo editing adjustments should I focus on when Editing Desert Photos taken during the Golden Hour Photography window?
When Editing Desert Photos captured during Golden Hour Photography, you should focus on enhancing warmth, texture, and contrast. Adjustments: 1. Temperature/White Balance: Slightly increase the warmth (move toward orange/yellow) to intensify the golden sunlight captured by the camera. 2. Clarity and Texture: Increase these sliders moderately to bring out the beautiful, intricate patterns and ripples in the sand dunes. 3. Shadows: Lift the shadows slightly to recover detail in the shaded areas, but ensure the shadows remain dark enough to maintain the dramatic contrast of the golden light.
6. Why is a telephoto lens (e.g., 70–200mm) essential for high-quality Desert Safari Photography, even though the scene is a vast landscape?
A telephoto lens is essential for high-quality Desert Safari Photography because it allows for compression and isolation. Compression: Telephoto lenses compress the distance between objects. This makes distant dunes appear much closer to one another, creating layers of texture and depth that are more dramatic than a wide-angle shot. Isolation: It allows you to isolate a subject, like a single camel or a distant person, against the backdrop without getting close, which is ideal for respectful and intimate Camel Ride Photography and high-impact abstract shots.
7. How can I achieve a perfect silhouette during Sunset Photography Dubai, ensuring the subject is completely dark against the bright sky?
To achieve a perfect silhouette during Sunset Photography Dubai, you must deliberately underexpose the subject by metering for the brightest part of the sky. Steps: 1. Switch to Manual (M) or Aperture Priority (A/Av) mode. 2. Point your camera at the brightest part of the sky near the sun and adjust your exposure until the sky looks properly exposed. 3. Recompose your shot, placing your subject (camel, person, tent) against the bright sky. Because the camera is set to expose the bright background, the darker foreground subject will be rendered as a pure black silhouette, creating a dramatic, clean shape in your Desert Safari Photography.
8. What is the most effective shutter speed range for freezing the action in Dune Bashing Photos without making the image too dark?
The most effective shutter speed range for freezing the action in Dune Bashing Photos is between 1/1000th and 1/2000th of a second. Rationale: To completely freeze the motion of a vehicle moving quickly over the dunes, and the spray of sand it kicks up, you need a very fast shutter. Implementation: Set your camera to Shutter Priority (S/Tv) mode. If the resulting image is too dark, you must compensate by immediately increasing your ISO (e.g., from ISO 100 to ISO 400 or 800) to ensure you maintain the required brightness while keeping the fast shutter speed.
9. Why should I use the internal link https://royaldesertadventures.ae/ when planning my Safari Photography Gear requirements?
You should consider the internal link https://royaldesertadventures.ae/ when planning your Safari Photography Gear because premium tour operators often offer specialized, longer safaris that demand different gear. Rationale: Luxury safaris may include exclusive overnight stays, which are perfect for advanced Desert Night Sky Photos and require sturdier tripods and dedicated wide-angle lenses. Researching these premium offerings helps you prepare for the highest level of Desert Safari Photography and the potential conditions of a specialized tour.
10. What safety protocols should I follow regarding my camera when attempting low-angle shots for dramatic Desert Photo Tips?
When attempting low-angle shots for dramatic Desert Photo Tips, the primary safety protocol is prevention of ground contact. Protocol: 1. Shoot into the wind: Keep your body shielded on the windward side to protect the lens. 2. Use a ground cloth: Lay a small cloth or jacket on the sand to place your camera on, preventing direct contact with the abrasive sand. 3. Avoid changing lenses: Never change lenses while the camera is near the ground. Use your camera’s articulating screen, if available, to compose without placing the camera directly on the sand.
11. What is the difference between a high-quality Arabian Desert Pictures and a standard tourist snapshot, and how does composition factor in?
The difference between a high-quality Arabian Desert Pictures and a standard tourist snapshot is primarily in the intentional use of composition, light, and depth. Snapshot: Often centered, taken in harsh light, and lacks a focal point. High-Quality Photo: Utilizes the Golden Hour Photography light, adheres to the Rule of Thirds, and includes a clear foreground, middle ground, and background to create depth. The high-quality image uses lines and shadows to guide the viewer’s eye, transforming the simple scene into a captivating narrative.
12. How can I use external resources like https://dubaidesertsafarie.com/ and https://hafiztourism.com/ to enhance my Desert Safari Photography planning?
You can use external resources like https://dubaidesertsafarie.com/ and https://hafiztourism.com/ to enhance your Desert Safari Photography planning by gaining operational intelligence. Strategy: 1. Itinerary Timing: Check their sample itineraries for the exact times of the dune bashing, camel ride, and camp arrival. This allows you to plan your camera settings for action versus sunset light. 2. Visual Research: Look at their gallery photos to understand the lighting and specific vehicles used, helping you set expectations and select the appropriate Safari Photography Gear.
13. Why is it important to shoot in RAW file format rather than JPEG for all your Desert Safari Photography efforts?
It is critically important to shoot in RAW file format rather than JPEG for all your Desert Safari Photography efforts because RAW retains maximum image data. Advantage: The desert’s extreme contrast (very bright sand/sky vs. dark shadows) often leads to lost detail. The RAW file holds significantly more dynamic range and color information, making it far easier to recover detail in blown-out highlights or deep shadows during Editing Desert Photos. JPEG is compressed and discards much of this vital information, limiting your editing flexibility.
14. What are the best creative ideas for taking unique Dune Bashing Photos beyond just freezing the action of the vehicle?
For unique Dune Bashing Photos, focus on capturing the effect of the action rather than just the vehicle itself. Ideas: 1. Motion Blur (Panning): Use a slow shutter speed (1/60th) to blur the background while keeping the car relatively sharp, emphasizing speed. 2. Abstract Lines: Zoom in tightly on the curved lines and shadows created in the sand after the vehicle passes. 3. Sand Spray Silhouette: Position yourself so the vehicle is backlit during the late afternoon, making the flying sand spray look like a dramatic, luminous cloud against the sun. These techniques transform simple snapshots into dynamic Desert Safari Photography art.
15. How should I approach color grading in post-processing to make my Desert Night Sky Photos look professional and reduce light pollution?
To make your Desert Night Sky Photos look professional and reduce light pollution during post-processing, focus on specific color and noise adjustments. Color Grading: 1. White Balance: Adjust the temperature slider toward the cool, blue tones to emphasize the darkness of the sky. 2. Tint: Slightly move the tint slider towards magenta to counteract any yellow or green light pollution cast by distant cities. Noise Reduction: Apply noise reduction cautiously, primarily in the darker shadow areas, using a masking brush to avoid blurring the stars. This refined Editing Desert Photos approach maximizes the impact of the stars.