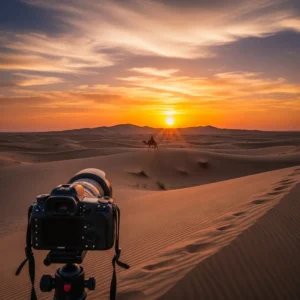
Desert Sunrise Photography: 9 Essential Steps to Capture the Perfect Dawn
There is a quiet, almost spiritual magic to the desert in the moments just before dawn. It is a time of profound stillness, where the world is painted in soft, cool tones and the silence is broken only by the whisper of the wind. For a photographer, capturing this transient beauty is a uniquely rewarding challenge. While the fiery drama of a sunset is captivating, the serene, pastel palette of a desert sunrise offers a completely different, yet equally powerful, photographic narrative.
Mastering desert sunrise photography is an endeavor that demands dedication. It requires waking in the pre-dawn darkness, braving the morning chill, and setting up your equipment while the world is still asleep. But the rewards are immense: pristine, untouched dunes stretching to the horizon, the chance to witness desert wildlife at its most active, and the opportunity to photograph a quality of light that is gentle, ethereal, and incredibly beautiful.
This in-depth guide provides nine essential steps for any photographer aspiring to conquer the art of the desert sunrise. We will cover everything from the crucial planning stages to the technical settings and compositional theories that will allow you to translate the tranquility and breathtaking beauty of a desert dawn into a stunning, unforgettable image. This is your complete roadmap to mastering desert sunrise photography.
Step 1: Recognize the Unique Advantages of a Sunrise Shoot
To truly succeed at desert sunrise photography, you must first understand and appreciate why you are waking up so early. The morning offers distinct advantages over an evening shoot.
The Pristine Canvas
The number one advantage of a sunrise safari is the opportunity to photograph a pristine landscape. The overnight winds will have sculpted the dunes into perfect, flowing lines, erasing all footprints and vehicle tracks from the previous day. You will be the first to witness and capture this untouched, flawless canvas, an opportunity that is completely lost by the time the afternoon safaris arrive.
A Softer, Cooler Palette
Sunrise light is fundamentally different from sunset light. The atmosphere is clearer and contains fewer particles, which results in a softer, cooler, and more subtle color palette. You will be working with gentle pinks, soft purples, cool blues, and delicate oranges. This ethereal light is perfect for creating serene, minimalist, and fine-art landscape images.
The Golden Hour for Wildlife
The cool temperatures of the early morning are when the desert’s elusive wildlife is most active. A sunrise safari significantly increases your chances of spotting and photographing the Arabian Oryx, sand gazelles, and other desert creatures as they forage before the heat of the day sets in.
Step 2: Book a Specialized Sunrise Safari
Your choice of tour operator is critical. You cannot simply show up in the desert; you need a tour that is specifically designed for the demands of early morning photography.
The Importance of an Early Start
A true desert sunrise photography tour will pick you up in the pre-dawn darkness, often as early as 4:00 AM. The goal is to get you into the desert and in position at your chosen location well before the first light appears on the horizon. This means you need an operator who understands the importance of capturing the blue hour and civil twilight.
Private is Paramount
Consider booking a private tour, such as those offered by https://royaldesertadventures.ae/. This gives you the ultimate flexibility. Your guide will be dedicated to your photographic needs, taking you to the best, most secluded spots and allowing you to stay as long as you need. This eliminates the constraints of a group schedule and ensures you don’t have to compete with others for the perfect shot.
Step 3: Prepare All Your Gear the Night Before
The last thing you want to be doing at 3:30 AM is frantically searching for a memory card or a charged battery. Meticulous preparation the night before is essential for a smooth and successful desert sunrise photography mission.
The Pre-Dawn Gear Checklist:
- Bag Check: Pack your camera bag with your camera body, lenses (wide-angle and telephoto), a sturdy tripod, remote shutter release, and any filters you plan to use.
- Power and Storage: Ensure all your camera batteries are fully charged, and pack at least one spare. Format your memory cards so they are empty and ready to go.
- Pre-set Your Camera: To save time in the dark, pre-set some basic settings. Set your camera to shoot in RAW format, choose your desired aperture (e.g., f/11), and set your ISO to its base level (e.g., 100).
- Essential Non-Camera Items: Pack a headlamp, preferably one with a red light setting to preserve your night vision. Dress in warm, layered clothing, as the desert is very cold before sunrise. A flask of hot coffee or tea is also a welcome companion.
Step 4: Arrive in Darkness and Shoot Through the Three Acts of Dawn
A sunrise is a process, not a single event. To capture the full story, you must be in position and shooting while it is still completely dark.
Act I: The Blue Hour (Pre-Sunrise)
This is the period of twilight when the sky is a deep, rich blue. It occurs roughly 60 to 30 minutes before the sun crests the horizon. This is a magical time to capture the cool, moody silhouette of the dunes against the dark blue sky, creating images with a profound sense of peace and solitude.
Act II: Civil Twilight (First Light)
As the sun gets closer to the horizon, the blue hour gives way to civil twilight. The eastern sky will begin to glow with the first hints of color—pinks, purples, and soft oranges. This is the time to finalize your main composition, as the landscape will become visible, but the light is still incredibly soft and colorful. This is a critical phase of desert sunrise photography.
Act III: The Golden Hour (The Sun’s Arrival)
The moment the sun breaks the horizon is the dramatic peak. As it rises, it will cast long, soft shadows across the landscape, revealing the texture and form of the dunes. This is the time to shoot continuously, as the light and shadows change with every passing minute.
Step 5: Master the Art of the Sunburst
A classic and beautiful technique in desert sunrise photography is capturing the sun as a sharp, brilliant starburst. This adds a dynamic and professional touch to your images.
The Technique for a Perfect Sunburst
The effect is created by using a very small aperture, which causes the light to diffract around the aperture blades inside your lens.
- Set your camera to Manual (M) or Aperture Priority (A/Av) mode.
- Choose a high f-stop number, such as f/16, f/18, or f/22. The smaller the aperture, the more defined the starburst will be.
- Partially obscure the sun with an element in your scene, like the crest of a dune. This helps to control the intense light and enhances the effect.
- Ensure your lens is perfectly clean, as any dust spots will be very noticeable.
Step 6: Use Composition to Convey Serenity
The mood of a desert sunrise is one of tranquility and peace. Your compositions should reflect this. While sunset photos are often about drama, sunrise photos excel with simplicity and minimalism.
Embrace Negative Space
Use the vast, clean expanses of the sky or the smooth face of a large dune as negative space. Placing a small, single subject—like a lone tree or a distant gazelle—within this large empty space creates a powerful sense of scale and solitude.
Find the “Hero Dune”
Scan the landscape for the most beautifully shaped and well-lit dune. Look for elegant S-curves or a sharp, dramatic crest. Make this “hero dune” the central element of your composition, allowing its perfect form to be the star of the shot. While many safaris from companies like https://dubaidesertsafarie.com/ follow set paths, a private tour allows you this freedom to find the perfect composition.
Step 7: Nail Your Exposure with Bracketing
The dynamic range during a sunrise can be just as challenging as a sunset. The sky will be very bright while the unlit parts of the desert will be in deep shadow. Bracketing is the professional’s solution.
The Safety Net of Bracketing
Set your camera’s drive mode to continuous shooting and activate the Automatic Exposure Bracketing (AEB) feature. Your camera will then take a rapid sequence of three, five, or seven photos at different exposure levels (dark, normal, bright). This ensures that even if your initial settings are slightly off, you will have a usable frame in the sequence.
The Potential for HDR
These bracketed shots can also be merged together later in software to create a High Dynamic Range (HDR) image. This technique allows you to create a final photo that retains rich detail in both the brightest highlights of the sky and the darkest shadows of the dunes, perfectly capturing the entire range of light you witnessed.
Step 8: Focus Manually for Guaranteed Sharpness
In the low light of the pre-dawn and early morning, your camera’s autofocus system will often struggle, hunting back and forth and failing to lock on. To ensure your images are perfectly sharp, you must switch to manual focus.
The Live View Method
The most accurate way to focus manually is to use your camera’s Live View screen.
- Place your camera on your tripod and point it towards the horizon.
- Switch your lens to Manual Focus (MF).
- Engage Live View and use the magnify button to digitally zoom in on a distant, high-contrast point (like a distant dune crest or, if visible, a bright star).
- Carefully turn the focus ring on your lens until that point is as sharp as possible.
- Once set, don’t touch the focus ring again. Your focus is now locked for all your landscape shots.
Step 9: Enhance the Pastel Palette in Post-Processing
Your work isn’t done when you press the shutter. Post-processing is the final step in bringing your vision for desert sunrise photography to life. The goal is to enhance the natural, soft beauty of the scene.
A Lightroom Workflow for Sunrise:
- Shoot in RAW: This is non-negotiable. It gives you the maximum flexibility to edit your photos.
- White Balance: Start by setting the white balance. Sunrise light is cool, so don’t be afraid to keep the tones slightly on the blue or magenta side to maintain that pre-dawn feel.
- Exposure: Gently lift the shadows to reveal detail in the dunes, but be careful not to make them look unnaturally bright. Use the highlights and whites sliders to ensure you haven’t lost detail in the glowing sky.
- HSL/Color Panel: This is your most powerful tool. Subtly enhance the pastel colors. You can increase the saturation and luminance of the pinks, purples, and soft oranges while keeping the blues rich and deep.
By embracing the early morning, you will be rewarded with photographic opportunities that few ever witness. The path to mastering desert sunrise photography is a journey of patience and preparation, but the serene and breathtaking images you create will be a lasting testament to your dedication. For those looking to explore this further, researching sunrise-specific tours from operators like https://hafiztourism.com/ can provide valuable insights into what’s available.
Frequently Asked Questions (FAQs)
1. What is the absolute earliest I need to arrive in the desert for a sunrise shoot? You should aim to be on location and have your tripod set up at least 60-75 minutes before the official sunrise time. This ensures you are ready to capture the entire “blue hour,” which is the magical period of deep blue light before any hint of sun appears. The best colors and light often happen before the sun actually crests the horizon.
2. How cold does it get in the desert before sunrise? It gets surprisingly cold. During the winter months (December-February), temperatures can drop to near 10°C (50°F) or even lower. It is essential to dress in warm layers, including a thermal base layer, a fleece or mid-layer, and a windproof outer jacket. A beanie, gloves, and warm socks are also highly recommended.
3. What is a headlamp with a “red light” setting, and why do I need one? A headlamp is crucial for setting up your gear in the dark. A model with a red light mode is preferred by photographers because red light does not constrict your pupils in the same way white light does. This means you can use the red light to see your camera settings and bag without ruining your eyes’ adaptation to the darkness, allowing you to better see the faint light and compositions on the horizon.
4. What are my chances of seeing wildlife on a sunrise safari? Your chances are significantly higher on a sunrise safari compared to any other time. The cool morning hours are when animals like the Arabian Oryx and sand gazelles are most active, grazing and moving around before the heat forces them to seek shelter. A dedicated sunrise tour, especially within a conservation reserve, provides the best opportunity for desert wildlife photography.
5. How do I avoid getting condensation on my camera lens? Condensation can occur when you move your cold camera from an air-conditioned car into the warmer, more humid morning air. To prevent this, leave your camera inside your camera bag for 15-20 minutes after you get out of the car. This allows the equipment to acclimatize to the ambient temperature slowly, preventing fog from forming on the lens.
6. What are the best camera settings for capturing desert wildlife in the morning? For wildlife, you need a fast shutter speed to freeze motion. Switch to Shutter Priority (S or Tv) or Manual (M) mode. Aim for a shutter speed of at least 1/500s or faster. To achieve this in the low morning light, you will need to use a wide aperture (e.g., f/4 or f/5.6) and increase your ISO (e.g., 800, 1600, or even higher). Use your camera’s burst mode to capture a sequence of shots, increasing your chances of getting a sharp image.
7. Is fog or mist common in the Dubai desert in the morning? During certain times of the year, particularly in the winter months during periods of high humidity, morning fog is a relatively common and spectacular phenomenon in the Dubai desert. If you are lucky enough to encounter it, it can create incredibly atmospheric and moody photos, with the tops of the dunes poking through a sea of mist.
8. How do I compose a shot if it’s too dark to see the landscape clearly? This is where preparation and your headlamp come in. When you first arrive in the dark, use your headlamp (on its white light setting initially) to scan the area and find a promising composition. Look for strong dune shapes and leading lines. Once you have your tripod set up, you can take a few long exposure test shots at a very high ISO, which will give you a bright, noisy preview on your screen to help you fine-tune your composition.
9. What is the biggest challenge of desert sunrise photography? The biggest challenge is logistical and mental. It requires the discipline to wake up extremely early, prepare meticulously in the dark, and work quickly as the light changes rapidly. Technically, the main challenge is dealing with the low light levels and the high dynamic range as the sun appears, which demands a solid understanding of manual camera settings and techniques like bracketing.
10. “Exposing to the right” (ETTR) – should I use this for sunrise? ETTR is an excellent technique for sunrise photography. It involves making your image as bright as possible in-camera without clipping the highlights (making them pure white). This captures the maximum amount of detail from the deep shadows of the pre-dawn landscape. When you correctly darken the image in post-processing, the shadow areas will have significantly less digital noise than if you had shot them dark originally. It requires shooting in RAW and carefully monitoring your camera’s histogram.
11. What is the best lens for a desert sunrise? A versatile wide-angle zoom lens, such as a 16-35mm on a full-frame camera or a 10-22mm on a crop-sensor camera, is generally the most useful. It allows you to capture the vast, sweeping scale of the landscape and the expansive sky. However, also having a telephoto lens (e.g., 70-200mm) is great for isolating distant dunes or capturing wildlife.
12. How do I use my own footprints compositionally? As one of the first people on the dunes, your own footprints can become a powerful compositional tool. You can create a trail of footprints leading from the corner of your frame towards your main subject (like a “hero dune”). This acts as a perfect leading line, adding a human element and a sense of journey to your photograph.
13. My sunrise photos look too blue or too cold. How can I fix this? This is a matter of white balance. While the pre-dawn light is naturally cool and blue, your camera’s Auto White Balance may exaggerate it. You can warm it up in-camera by using the “Shade” or “Cloudy” presets. In post-processing, if you shot in RAW, you have complete control. You can use the Temperature and Tint sliders in Lightroom to adjust the white balance to your creative taste, either preserving the cool tones or warming them up for a more golden feel.
14. What is hyperfocal distance and should I use it for sunrise landscapes? Hyperfocal distance focusing is an advanced technique to maximize depth of field (sharpness from front to back). It involves focusing at a specific point in your scene that ensures everything from a certain foreground element to infinity is acceptably sharp. While powerful, a simpler method for most photographers is to focus roughly one-third of the way into your scene or to use the Live View magnification method to focus on a distant object, which will yield excellent results at apertures like f/11 or f/16.
15. Is it better to shoot a single “hero” shot or a variety of images? While it’s great to have a primary composition you are working on, you should always capture a variety of images. The light changes so quickly during a sunrise that different compositions will work better at different times. Shoot wide landscapes, telephoto abstracts of dune patterns, vertical compositions, and look for small details. This variety will give you a much richer and more complete story of the morning.
16. How do I protect myself from the cold while waiting for the sun? Layering is key. Start with a thermal base layer, add a fleece or wool mid-layer, and finish with a windproof and preferably insulated jacket. A warm hat or beanie is essential as you lose a lot of heat through your head. Insulated gloves (especially ones that allow you to operate your camera) and warm socks with sturdy shoes will keep your extremities comfortable. A hot drink in a thermos is also a great morale booster.
17. What’s the best way to find a good composition in the dark? Use a strong flashlight or your headlamp’s brightest setting to “light paint” the landscape in front of you. By shining the light across the dunes, you can reveal their shapes, curves, and textures, helping you to identify promising leading lines and subjects. Taking a few very high-ISO test shots can also reveal the landscape on your camera’s screen before it’s visible to the naked eye.
18. Should I shoot a panorama of the sunrise? A panorama can be a fantastic way to capture the immense scale of the desert at dawn. To shoot one, level your tripod and set your camera to Manual mode to lock in the exposure. Take a series of vertical shots, overlapping each image by about 30%. You can then stitch these individual photos together into one epic, high-resolution panoramic image using software like Adobe Lightroom.
19. My camera battery drains very quickly in the cold. How can I prevent this? Cold temperatures significantly reduce battery performance. The best way to combat this is to keep your spare batteries warm. Don’t leave them in your camera bag. Instead, keep them in an inside pocket of your jacket, close to your body heat. When your active battery starts to die, swap it with one of the warm ones.
20. Is the effort of a sunrise safari really worth it compared to a sunset one? For a dedicated photographer, it is absolutely worth it. The experience and the resulting images are completely different. A sunrise safari offers a sense of tranquility, solitude, and the unique opportunity to photograph a pristine, untouched world painted in soft, ethereal light. While a sunset is a fiery, dramatic spectacle, a sunrise is a quiet, meditative experience that produces serene and often more unique photographs.