Desert Safari Photography Capturing the Ethereal Essence of the Dubai Dunes
Desert Safari Photography represents the pinnacle of travel imagery for visitors coming to the United Arab Emirates in 2026. The vast, undulating landscapes of the Arabian desert provide a dramatic backdrop that is unmatched by any city skyline. To truly master the art of the lens in this sandy terrain, one must understand more than just shutter speed.
Every tourist wants that iconic shot of the sun dipping below the orange horizon, casting long, artistic shadows across the ripples of the dunes. However, Desert Safari Photography comes with unique environmental challenges. The fine silica dust, the intense glare, and the rapidly changing light conditions require a proactive approach to content creation.
In this extensive exploration, we will look at how you can elevate your Desert Safari Photography from simple snapshots to professional-grade gallery pieces. We will cover technical settings, creative posing, and the essential protection your gear needs in the harsh climate. Let us begin this journey into the golden light of the Emirates.
Understanding the Golden Hour for Desert Safari Photography
The most critical element of successful Desert Safari Photography is timing. Professional photographers live by the “Golden Hour,” which occurs during the first hour of light after sunrise and the last hour of light before sunset. In the desert, this window is even more precious because of how the sand reflects warmth.
During the golden hour, the sun is low on the horizon, creating a soft, diffused light that eliminates harsh vertical shadows. This is the best time for Desert Safari Photography because it highlights the intricate textures and “ribs” of the sand dunes. The orange hues of the desert become saturated, providing a natural filter for your portraits.
If you miss this window, the midday sun can make Desert Safari Photography quite difficult. High noon creates flat lighting and “washed out” colors. Therefore, choosing an evening tour that prioritizes sunset stops is essential for anyone serious about their travel portfolio.
Essential Gear Protection for the Sandy Environment
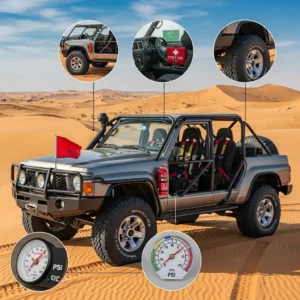
One aspect of Desert Safari Photography that tourists often ignore is equipment safety. The desert is a hostile place for high-end electronics. Fine sand particles can easily penetrate lens barrels and sensor chambers, causing permanent mechanical damage or annoying spots on your images.
A major tip for Desert Safari Photography is to never change your lenses while standing on the dunes. The wind carries micro-dust that you cannot even see. Instead, use a versatile zoom lens or change your optics inside the air-conditioned vehicle. This simple habit saves thousands of dollars in repair costs.
-
UV Filters: Always keep a high-quality UV filter on your lens to protect the front glass from sand abrasion.
-
Weather Sealing: If possible, use weather-sealed camera bodies and lenses for better Desert Safari Photography durability.
-
Blower Brushes: Carry a small air blower to remove dust; never wipe the lens with a dry cloth first as it can scratch.
-
Plastic Wraps: In windy conditions, a simple plastic sleeve around the camera body adds an extra layer of security.
Creative Posing Techniques for High Impact Portraits
Desert Safari Photography is not just about the landscape; it is about how you fit into it. To create a sense of scale, the photographer should position the subject on the crest of a distant dune. This emphasizes the vastness of the environment and creates a powerful silhouette against the sky.
Flowing fabrics are a secret weapon in Desert Safari Photography. Long dresses, lightweight scarves, or traditional Arabian capes catch the desert breeze beautifully. This movement adds a dynamic, cinematic quality to your photos that static posing simply cannot match.
For a more intimate look in Desert Safari Photography, try the “Low-Angle” shot. By placing the camera close to the sand, you make the dunes appear like mountain ranges. This perspective adds drama and makes the viewer feel as though they are crawling through the beautiful wilderness themselves.
Technical Settings for Vibrant Desert Images
When engaging in Desert Safari Photography, your camera’s light meter can often be fooled by the bright sand. To get the best results, you might need to use exposure compensation. Slightly underexposing your shots can help preserve the rich details in the sky and prevent the highlights on the dunes from “blowing out.”
A wide aperture (low f-number) is excellent for Desert Safari Photography portraits, as it blurs the background and focuses all attention on the subject. However, for vast landscapes, you should use a narrow aperture (f/8 to f/11) to ensure the sharp details of the sand ripples are visible from the foreground to the horizon.
| Setting | Recommended Value | Reason |
| ISO | 100 – 200 | Keeps image noise at a minimum in bright light |
| Aperture (Landscape) | f/8 – f/11 | Ensures deep focus across the dunes |
| Aperture (Portrait) | f/1.8 – f/4 | Creates a beautiful bokeh effect |
| Shutter Speed | 1/500 or higher | Freezes the movement of sand or flowing clothes |
| White Balance | Cloudy / Shade | Enhances the warm, golden tones of the sand |
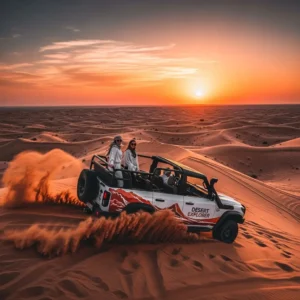
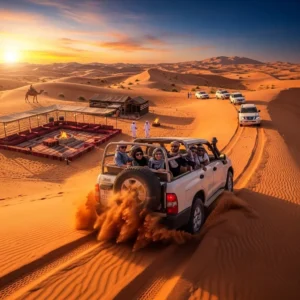
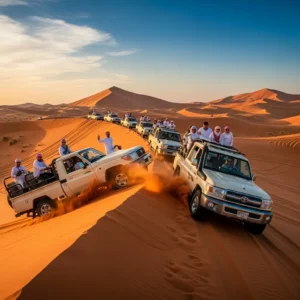
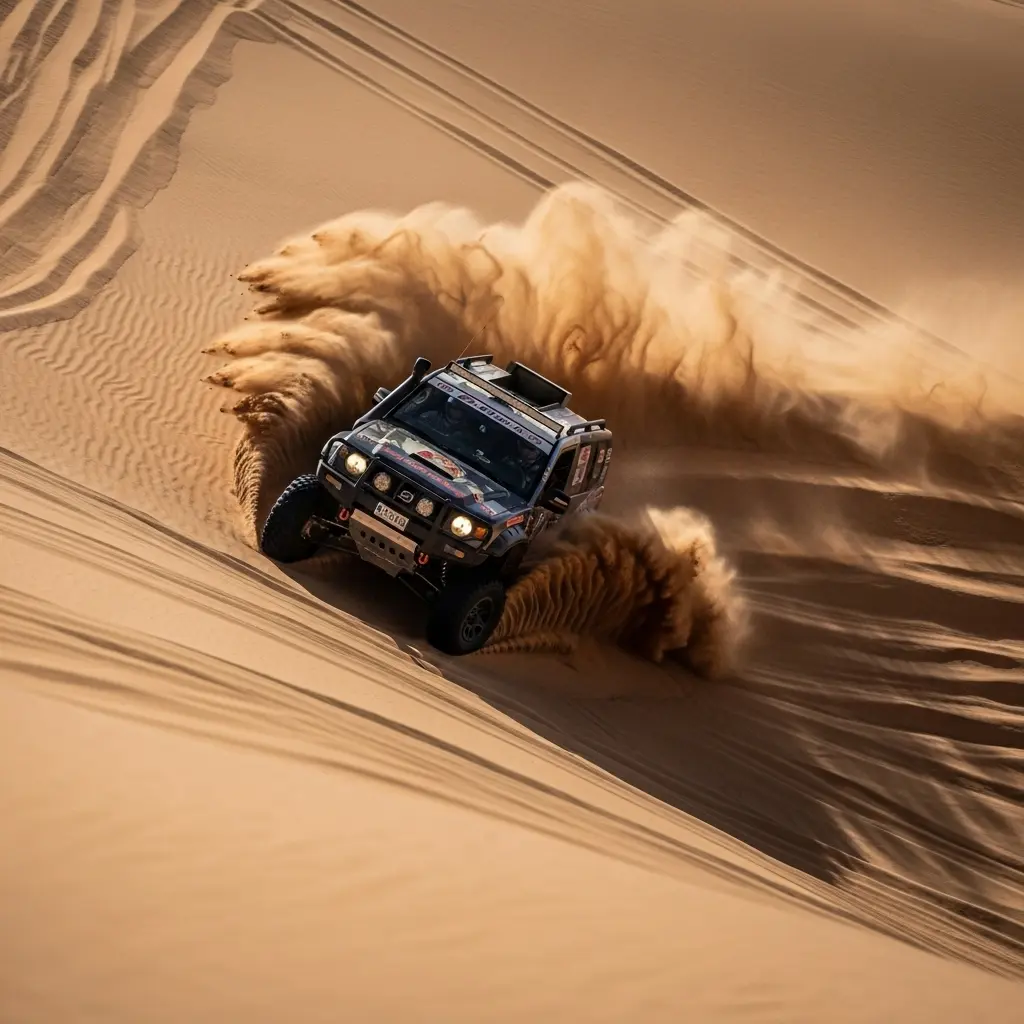
Capturing the Adrenaline of Dune Bashing
Dune bashing offers some of the most exciting opportunities for Desert Safari Photography, but it is also the most difficult to capture. The fast movement and bumpy ride make for blurry shots if you are not prepared. Using “Shutter Priority” mode is a great hack for these moments.
To get a great Desert Safari Photography shot of the action, set your shutter speed to at least 1/1000. This freezes the sand spray as the 4×4 drifts across the dunes. If you are inside the vehicle, use a wide-angle lens to capture the expressions of your fellow travelers against the tilted horizon outside the window.
Always be mindful of your safety during Desert Safari Photography while in motion. Never unbuckle your seatbelt for a photo. Many professional photographers prefer to capture the vehicles from a distance during a scheduled stop to get the full “action movie” look without the physical risk.
The Art of Silhouette Photography in the UAE
As the sun sets, Desert Safari Photography transitions into the realm of silhouettes. This is one of the most popular styles for Instagram and professional travel blogs. To achieve this, you must place your subject directly between your camera and the setting sun.
Focus on the sky, not the person. This causes the camera to expose for the bright light, turning the subject into a crisp, black outline. Desert Safari Photography silhouettes work best when the person is doing something active, like jumping, walking along a ridge, or holding a traditional falcon.
The contrast between the black shape of the subject and the fiery oranges and purples of the sky is the hallmark of premium Desert Safari Photography. It tells a story of mystery and adventure that resonates with viewers across the globe.
Utilizing Props to Enhance the Narrative
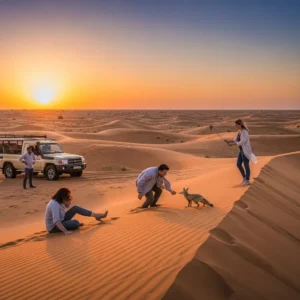
Using props can significantly improve the storytelling aspect of your Desert Safari Photography. A traditional Arabian lantern, a vintage compass, or even a local falcon adds a layer of cultural depth to the image. These items provide a focal point and help the viewer connect with the heritage of the region.
Camels are, of course, the ultimate prop for Desert Safari Photography. When photographing these “ships of the desert,” try to get low to the ground. Shooting from a low angle makes the camel look majestic and towering. Avoid “touristy” shots and instead look for candid moments of the camels resting or interacting with their handlers.
If you are looking for high-quality tours that allow time for these creative setups, check out https://royaldesertadventures.ae/ or https://dubaidesertsafarie.com/. These platforms feature operators who understand the needs of modern content creators and provide ample opportunities for Desert Safari Photography.
Post-Processing Tips for the Desert Aesthetic
The work of Desert Safari Photography does not end when you leave the dunes. Post-processing is where you fine-tune the “vibe” of your trip. In 2026, the trend is toward “warm and moody” edits. Enhancing the oranges and yellows while slightly desaturating the blues creates a sophisticated look.
In Desert Safari Photography editing, pay close attention to “Texture” and “Clarity.” Increasing these sliders slightly will make the fine grains of the sand pop. However, be careful not to overdo it, as too much clarity can make your portraits look harsh and unflattering.
-
Warmth: Increase the color temperature to bring out the sun-kissed feel.
-
Shadows: Lift the shadows to reveal details in the dark parts of the dunes.
-
Cropping: Use the rule of thirds to place the horizon on the upper or lower horizontal line.
-
Dehaze: Use this tool if the desert heat has created a “mirage” effect that looks too blurry.
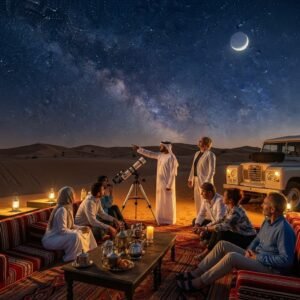
Night Sky and Stargazing Photography
Once the sun has set and the camp lights are dimmed, Desert Safari Photography enters a new phase: astrophotography. Away from the light pollution of the city, the desert sky is filled with thousands of visible stars. This is a rare opportunity for tourists to capture the Milky Way.
To succeed in this type of Desert Safari Photography, you absolutely need a tripod. Even the best image stabilization cannot handle the 20-30 second exposures required for stars. Use a wide-angle lens with a fast aperture (f/2.8 or lower) and set your focus to infinity to get sharp, celestial results.
Including a silhouette of a tent or a lone Ghaf tree in your night-time Desert Safari Photography adds a sense of place. It tells the viewer that these stars were captured in the heart of the Arabian wilderness, adding an extra layer of wonder to your travel gallery.
Cultural Etiquette and Respectful Photography
While the pursuit of great Desert Safari Photography is exciting, it must always be balanced with cultural respect. The UAE is a conservative society with deep traditions. Always ask for permission before taking photos of local people, especially women and the elderly.
In many desert camps, photography of the prayer areas or certain private Majlis sections is discouraged. A professional approach to Desert Safari Photography involves being a guest first and a photographer second. Building a rapport with your guides and the camp staff will often lead to better, more authentic photo opportunities that “paparazzi-style” tourists miss.
Respecting the environment is also a core part of Desert Safari Photography. Do not leave any trash behind while chasing the perfect shot. The beauty of the desert relies on it remaining pristine. As a photographer, you are a steward of the landscape you are capturing.
Strategic Internal Resources for Booking
For travelers who want to ensure they are with a company that understands the needs of Desert Safari Photography, visiting https://htdesertsafari.com/ is a vital step. Many standard tours are too rushed for serious photography, but specialized or private packages offer the flexibility needed to wait for the perfect light.
By choosing a tour from https://htdesertsafari.com/, you can often request a driver who is experienced in finding the most photogenic dunes. This internal booking strategy ensures that your Desert Safari Photography goals are met without the frustration of a “mass-market” schedule that doesn’t stop for the sunset.
Landscape Composition Rules for the Sand
The desert can look “flat” on camera if you don’t use proper composition. In Desert Safari Photography, look for “leading lines.” These are natural lines in the sand, such as the ridges formed by the wind, that lead the viewer’s eye into the frame.
Another rule for Desert Safari Photography is to include a “foreground interest.” This could be a small desert shrub, a pattern of footprints, or even a discarded traditional coffee pot. Having something in the foreground creates a 3D effect, making the vast desert landscape feel more immersive and real.
Experimenting with different focal lengths is also beneficial. While wide-angle is common for Desert Safari Photography, using a telephoto lens (70-200mm) can “compress” the dunes. This makes them look like they are stacked on top of each other, creating a dramatic and abstract pattern that is very popular in 2026.
Dealing with Extreme Light and Harsh Glare
The Arabian sun can be brutal for Desert Safari Photography. Between 11:00 AM and 3:00 PM, the light is so bright that it can wash out the colors of the sand entirely. If you must shoot during these hours, a Circular Polarizer (CPL) filter is essential.
A CPL filter acts like sunglasses for your camera. In Desert Safari Photography, it reduces reflections from the sand and makes the blue sky look much deeper and richer. It also helps to cut through the heat haze that often occurs over the dunes, resulting in sharper and clearer images.
Furthermore, using your lens hood is a simple but effective Desert Safari Photography trick. It prevents “lens flare”—those circles of light that happen when the sun hits the glass directly. Unless you are intentionally looking for a retro, “sun-drenched” look, keeping the flare away will result in much better contrast.
The Role of Mobile Photography in the Desert
You don’t need a professional camera to enjoy Desert Safari Photography. Modern smartphones in 2026 have incredible sensors and AI processing. Many tourists find that the “Night Mode” and “Portrait Mode” on their phones are more than sufficient for capturing high-quality desert memories.
One tip for mobile Desert Safari Photography is to use the “Raw” format if your phone supports it. This gives you much more flexibility when editing the colors of the sand and sky later. Also, remember to clean your phone lens frequently; finger oils can make your desert sunset shots look blurry or “foggy.”
-
Grid Lines: Turn them on to ensure your desert horizon is perfectly level.
-
Focus Lock: Tap and hold on your subject to lock the focus and exposure.
-
Burst Mode: Use this for sand-toss or jumping photos to get the perfect frame.
-
Wide Lens: Use the 0.5x lens for epic landscape shots of the dunes.
Planning a Photography Specific Safari
If your main goal for the trip is Desert Safari Photography, you should consider a private tour. This allows you to dictate the schedule. You can spend an hour at a single location waiting for the light to hit a specific dune, something that is impossible on a shared group tour.
When you book through https://htdesertsafari.com/, you can specify your interest in photography. This ensures that the operator assigns a driver who knows the “hidden gems” of the desert—spots that are away from the main tourist tracks and offer untouched sand for your Desert Safari Photography.
A private tour also means you have more space for your gear. You can bring a tripod, multiple lenses, and even lighting equipment without worrying about bothering other passengers. This is the ultimate way to ensure your Desert Safari Photography is of professional caliber.
Capturing the Details: Macro in the Desert
While wide landscapes are the star of Desert Safari Photography, the small details are just as beautiful. Close-up shots of sand grains, desert insects, or the intricate patterns of a dried-out bush can add a wonderful variety to your photo album.
Macro Desert Safari Photography requires a steady hand and a low perspective. Look for the “Golden Ripples” created by the wind. These small patterns look like frozen waves and are a favorite subject for abstract photographers. Capturing the contrast between the sharp sand edges and the soft shadows is a great exercise in visual storytelling.
Don’t forget the cultural details at the camp. The steam rising from a cup of traditional Arabic coffee, the texture of a hand-woven carpet, and the intricate henna designs on a guest’s hand are all essential parts of the Desert Safari Photography narrative.
Safety and Environmental Awareness for Photographers
No photo is worth a risk to your safety or the environment. In Desert Safari Photography, never wander too far from your vehicle. The dunes all look the same, and it is incredibly easy to lose your sense of direction. Always keep your guide or vehicle in sight.
Additionally, Desert Safari Photography should follow “No Trace” principles. The dunes are a fragile ecosystem. Do not disturb wildlife or plants for a shot. If you find a pristine area of sand with no tracks, try to keep it that way. Walk carefully and avoid creating unnecessary footpaths that spoil the view for others.
Respect the “No-Fly Zones” if you are using a drone for Desert Safari Photography. Dubai has strict regulations, and flying near airports or military areas can result in heavy fines. Always check the official GCAA app before launching your drone in the desert.
Leveraging Social Media Trends for Desert Content
In 2026, Desert Safari Photography is heavily influenced by social media trends. Vertical video and “Cinematic Reels” are just as important as still photos. Using the “Slow-Motion” feature on your phone to capture sand falling through your fingers is a classic trend that consistently performs well.
When posting your Desert Safari Photography, use a mix of wide landscape shots and intimate portraits. This “storytelling” approach keeps your audience engaged. Mentioning the specific location, such as the Lahbab Red Dunes, also helps other travelers find the best spots for their own adventures.
Don’t forget to tag the operators who provided the experience. High-quality services like https://royaldesertadventures.ae/ often feature guest photos on their own pages, giving your Desert Safari Photography even more reach and visibility within the global travel community.
Conclusion: Creating a Lasting Visual Legacy
Desert Safari Photography is more than just taking pictures; it is about preserving the magic of the Arabian wilderness. By understanding the light, protecting your gear, and respecting the culture, you can create a visual legacy that captures the true spirit of Dubai.
The desert is a place of constant change. Every wind brings new patterns and every sunset offers a different palette of colors. This means that every time you engage in Desert Safari Photography, you are capturing a unique moment in time that will never be repeated exactly the same way.
Enjoy the process, experiment with new angles, and don’t be afraid to get a little sand on your shoes. The best photos are often the ones where you were having the most fun. Let the beauty of the dunes inspire you and lead you to your best work yet.
Frequently Asked Questions
1. What is the best time for Desert Safari Photography in Dubai?
The absolute best time for Desert Safari Photography is the “Golden Hour,” which is the hour before sunset and the hour after sunrise. During this time, the light is soft, warm, and creates long shadows that highlight the beautiful textures of the sand dunes. Midday photography is much harder because the light is very harsh and flattens the appearance of the landscape.
2. How can I protect my camera from sand during a safari?
Protection is vital for Desert Safari Photography. You should always use a UV filter to protect the lens glass from scratches. Never change your lenses out in the open; do it inside the car. Store your camera in a sealed bag when you are not using it. After the trip, use a soft blower brush to gently remove any dust from the exterior of your gear before wiping it down.
3. What colors should I wear for the best desert photos?
For high-impact Desert Safari Photography, you should wear colors that contrast with the orange sand. Bright reds, royal blues, emerald greens, and even vibrant yellows look incredible. White is also a classic choice that creates a clean, ethereal look. Avoid wearing beige, tan, or brown, as you will blend into the background and your photos will lack depth.
4. Do I need a professional camera for good desert photos?
No, modern smartphones are excellent for Desert Safari Photography. Many have “Night Mode” for stars and “Portrait Mode” for beautiful blurred backgrounds. The most important thing is understanding the light and composition. However, a professional camera with a zoom lens will give you more flexibility for distant wildlife or “compressing” the look of the dunes.
5. Is drone photography allowed during a desert safari?
Drone usage for Desert Safari Photography is strictly regulated in the UAE. You must register your drone with the GCAA and follow all local “No-Fly Zone” rules. Many tourist areas and conservation reserves have specific restrictions. Always ask your tour operator for permission and check the official government apps to ensure you are flying legally and safely.
6. How do I get a good silhouette shot in the desert?
To get a perfect Desert Safari Photography silhouette, place your subject between the camera and the setting sun. Tap on the brightest part of the sky on your phone screen to lock the exposure. This will turn the person into a black outline. This technique works best when the subject is doing an active pose, like a jump or walking along the ridge of a dune.
7. Should I book a private or shared tour for photography?
If your primary goal is Desert Safari Photography, a private tour is much better. On a shared tour, the driver has a fixed schedule and cannot wait for you to get the “perfect shot.” A private tour gives you the flexibility to stop whenever you see beautiful light and stay as long as you need to capture the dunes exactly how you want.
8. What are some good “props” for desert photos?
Common props that enhance Desert Safari Photography include traditional Arabian scarves (Ghutra), lanterns, vintage cameras, or even a local falcon. These items help tell a story and give the viewer a sense of the culture. Even a simple glass of Arabic tea can be a great focal point for a lifestyle shot at the desert camp.
9. How do I capture the “action” of dune bashing?
Capturing action in Desert Safari Photography requires a fast shutter speed (at least 1/500 or 1/1000). This freezes the sand as it sprays from the tires of the 4×4. If you are using a smartphone, use “Burst Mode” to take many photos quickly, then choose the one where the car and the sand look the most dramatic.
10. What is the best way to photograph a camel?
When doing Desert Safari Photography with camels, try to get down to their level. Shooting from a low angle makes the camel look powerful and majestic against the sky. Avoid standing too close to the back of the camel for safety, and try to capture the interaction between the camel and its handler for a more authentic, “human-interest” travel photo.
11. How do I handle the bright glare of the sand?
To manage glare in Desert Safari Photography, use a Circular Polarizer (CPL) filter. This helps reduce reflections from the sand and makes the blue sky look much deeper and more saturated. If you don’t have a filter, try to keep the sun to your side or back rather than shooting directly into it, which can cause “lens flare” and low contrast.
12. Can I take photos of local people at the camp?
In Desert Safari Photography, it is a major rule to always ask for permission before taking a photo of a local person. This is especially true for women and the elderly. Most performers, like the Tanoura dancers or the fire artists, are happy to be photographed during their show, but it is always polite to acknowledge them and show your respect for their craft.
13. What editing apps are best for desert photos?
For post-processing your Desert Safari Photography, Adobe Lightroom Mobile is the gold standard. It allows you to selectively edit the oranges and yellows of the sand. VSCO is also great for quick, film-style filters. Snapseed is a powerful, free option that has a “Selective” tool which is perfect for brightening up a subject that is too dark against the bright desert sky.
14. Why is my desert photo looking “flat” and boring?
If your Desert Safari Photography looks flat, it’s likely because of the light or the composition. Avoid shooting at noon when there are no shadows. Shadows are what give the dunes their shape and depth. Also, try adding something in the foreground, like a plant or a person, to create a sense of perspective and make the scene look three-dimensional.
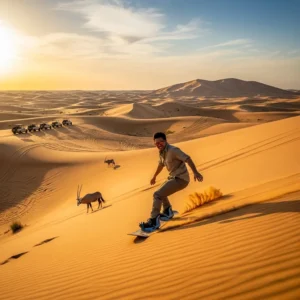
15. Is there wildlife I can photograph on a safari?
Yes, if you go to a conservation reserve, you can often include wildlife in your Desert Safari Photography. The Arabian Oryx and the Sand Gazelle are the most common. You might also see desert foxes or various birds of prey. Use a long lens to keep a respectful distance and avoid scaring the animals, which results in more natural-looking wildlife photos.
16. How do I photograph the fire show at night?
Night-time Desert Safari Photography of fire shows requires a steady hand. If you have a tripod, use it! Set a slightly slower shutter speed to capture the “trails” of the fire, or a very fast shutter speed to see the individual sparks. Most modern phones will handle fire well in “Night Mode,” but try to keep the camera very still to avoid blurring the performer.
17. What should I do if a sandstorm starts?
If a sandstorm starts, the priority is not Desert Safari Photography, but gear safety. Put your camera in a sealed bag immediately. The blowing sand acts like sandpaper and can ruin your lens glass in seconds. If you want to capture the “mood” of the storm, do it from inside the safety of the vehicle through the window to avoid exposing your equipment to the grit.
18. What is the “Sand Toss” photo?
This is a popular Desert Safari Photography trend where you grab a handful of dry sand and throw it into the air during the sunset. The light catches the individual grains, making them look like gold dust. Use a fast shutter speed to freeze the sand in mid-air. It’s a fun, creative shot that always looks great on social media.
19. Are there specific photography-themed safaris?
While most are general tours, some high-end companies at https://royaldesertadventures.ae/ offer “Photography Workshops” or private tours led by professional photographers. These are the best for learning Desert Safari Photography because the guide will help you with your settings and lead you to the best spots specifically for the light conditions of that day.
20. How do I capture the texture of the sand?
To highlight texture in Desert Safari Photography, you need “side lighting.” This happens when the sun is low (early morning or late afternoon). The light hits the ridges of the sand from the side, creating small shadows in every ripple. This contrast between light and dark is what makes the sand look “tactile” and sharp in your images.