Desert Sunset Photography: 11 Pro Tips for Absolutely Breathtaking Shots
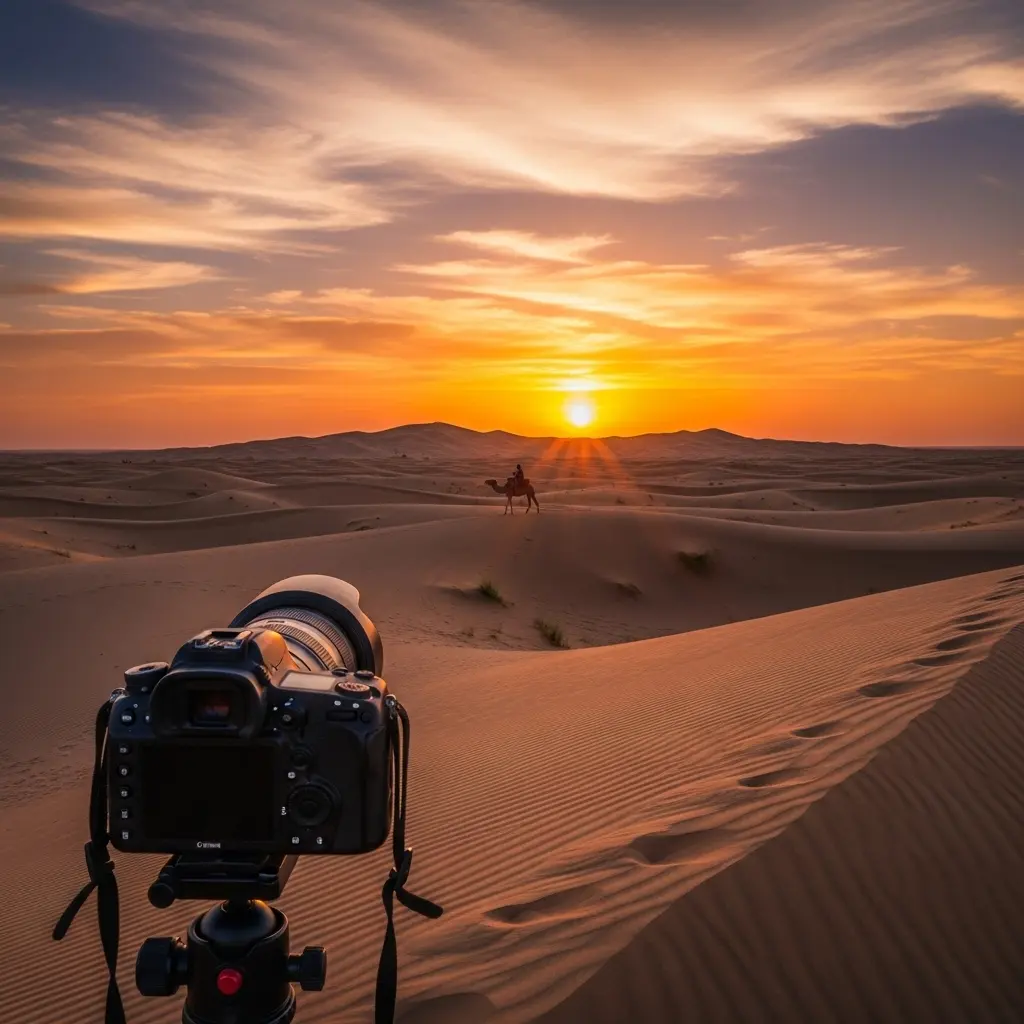
There are few sights on Earth as profoundly beautiful and emotionally resonant as a desert sunset. As the sun begins its descent, it ignites the sky in a fiery spectacle of color, casting long, dramatic shadows that sculpt the endless dunes into a masterpiece of light and form. For any photographer, capturing this fleeting magic is the ultimate prize. Yet, it is also one of the most challenging photographic pursuits. Many return from a desert safari with photos that fail to capture the majesty they witnessed, feeling a sense of frustration and missed opportunity.
Mastering desert sunset photography is a craft that extends far beyond simply pointing your camera at the sun. It is a delicate dance between technical understanding, artistic composition, and meticulous preparation. It requires you to anticipate the light, command your equipment, and see the landscape not just as a backdrop, but as an active character in your story.
This comprehensive guide is designed to be your definitive resource for conquering the art of the desert sunset. We will delve into 11 professional-grade tips, covering everything from the essential gear you must pack to the advanced camera settings and compositional secrets that will transform your images from simple snapshots into breathtaking works of art. Prepare to elevate your desert sunset photography and capture the soul of the desert in every frame.
Tip 1: Choose a Photography-Centric Desert Safari
Your ability to capture stunning sunset photos begins long before you touch your camera. It starts with choosing the right desert safari. Not all tours are created equal, and many standard packages are not designed with the patient photographer in mind.
Why Your Tour Choice Matters
A standard group tour often operates on a tight schedule, arriving at a crowded sunset spot with dozens of other vehicles and offering only a brief window for photos before rushing off to the camp. This is simply not conducive to high-quality desert sunset photography.
What to Look For
Opt for a private or photography-focused tour. These specialized safaris, like those offered by https://royaldesertadventures.ae/, prioritize the golden hour. A private guide understands the need for time and will take you to secluded, pristine locations away from the crowds. They will allow you the flexibility to set up your tripod, experiment with different compositions, and stay until the last vestiges of light have faded from the sky.
Tip 2: Pack the Right Gear for the Job
While a smartphone can capture decent images, for truly breathtaking desert sunset photography, specialized gear is essential. Packing the right equipment is half the battle.
The Essential Gear Checklist:
- A Camera with Manual Mode: A DSLR or mirrorless camera is crucial as it gives you full control over the exposure triangle (Aperture, Shutter Speed, ISO).
- A Sturdy Tripod: This is non-negotiable. As the light fades, you will need slower shutter speeds. A tripod is the only way to ensure your images are tack-sharp and free of camera shake.
- A Wide-Angle Lens: A lens in the 16-35mm range is perfect for capturing the vast, sweeping scale of the desert landscape against the colorful sky.
- A Telephoto Lens: A lens like a 70-200mm is invaluable for compressing the landscape, making distant dunes appear closer and larger, and for isolating subjects like a lone camel against the setting sun.
- Filters: A graduated neutral density (GND) filter is a secret weapon for balancing the exposure between the bright sky and the darker foreground. A circular polarizer can also help to deepen the colors in the sky and reduce atmospheric haze.
- Extra Batteries and Memory Cards: The desert heat can drain batteries faster, and you will be shooting a lot of photos (especially if bracketing). Be over-prepared.
Tip 3: Master the Three Acts of a Sunset
A desert sunset is not a single moment; it’s a three-act play of changing light, and each act offers unique photographic opportunities. Understanding this progression is key to maximizing your shoot.
Act I: The Golden Hour
This is the period roughly one hour before the sun sets. The light is soft, warm, and directional. This is the perfect time for portraits, capturing the golden glow on the sand, and shooting action shots like dune bashing, as the low light creates beautiful highlights and shadows. This is the prime time for classic desert sunset photography.
Act II: The “Afterburn” (Civil Twilight)
Do not pack up when the sun disappears below the horizon. The 15-25 minutes after sunset often produce the most intense and vibrant colors in the sky. This is the “afterburn,” when the hidden sun illuminates the undersides of clouds in fiery reds and purples.
Act III: The Blue Hour
Following the afterburn, the sky transitions into the blue hour. The light takes on a deep, serene blue hue, creating a cool, moody, and tranquil atmosphere. This is a fantastic time to capture the silhouette of the dunes against the rich blue sky or to photograph the warm lights of a desert camp as they begin to twinkle on.
Tip 4: Move Beyond Auto – Shoot in Manual Mode
To truly control the outcome of your desert sunset photography, you must take control away from your camera’s automatic settings. Shooting in Manual (M) or Aperture Priority (A/Av) mode is essential.
Why Manual Mode is Superior
In automatic mode, your camera will try to create a balanced exposure, which often results in either a washed-out, overexposed sky or a completely black, underexposed foreground. Manual mode allows you to set the aperture, shutter speed, and ISO independently, giving you the creative power to expose for the part of the scene that matters most to you—usually the vibrant sky.
A Starting Point for Manual Settings:
- Mode: Manual (M)
- Aperture: f/8 to f/16 (for a deep depth of field in landscapes)
- ISO: 100 (to maximize image quality and minimize noise)
- Shutter Speed: Adjust this setting while looking at your camera’s light meter until the exposure is correct for the sky’s highlights.
Tip 5: Use Advanced Techniques for Difficult Light
The desert sunset presents an extreme dynamic range—the difference between the brightest part of the scene (the sky) and the darkest part (the shadowed dunes) is huge. Your camera’s sensor often can’t capture this full range in a single shot. This is where advanced techniques come in.
Exposure Bracketing and HDR
Set your camera to shoot a bracket of three, five, or even seven exposures: one normal, and several progressively darker and brighter. In post-processing, you can blend these images together into a single High Dynamic Range (HDR) photo that retains detail in both the bright sky and the dark foreground.
Using a Graduated ND Filter
A physical filter, the Graduated Neutral Density (GND) filter, is another solution. It is dark on top and clear on the bottom, allowing you to darken the bright sky to match the exposure of the foreground in a single shot, resulting in a more natural and balanced image directly in-camera.
Tip 6: The Art of Composition: It’s Not Just About the Sun
A common mistake in desert sunset photography is making the setting sun the only subject. A truly great sunset photo uses the spectacular sky as a backdrop for a compelling composition.
Find Your Focal Point
Look for subjects to place within your scene to create a sense of scale and a point of interest. This could be:
- A camel train trekking across a distant dune.
- The silhouette of your 4×4 vehicle perched on a crest.
- A lone, gnarled Ghaf tree.
- A person (your travel companion) walking along a ridgeline.
Use Leading Lines and S-Curves
The desert is a landscape of beautiful, natural lines. Use the sharp, winding crests of the dunes as leading lines to guide the viewer’s eye through your photo. The graceful S-curves of rolling dunes create a natural, pleasing flow and rhythm in your composition.
Tip 7: Master the Power of the Silhouette
One of the most dramatic and evocative images you can create is a silhouette. The intensely bright sky of a desert sunset provides the perfect canvas for this powerful technique.
How to Create a Perfect Silhouette
The technique involves intentionally underexposing your subject to render it as a solid black shape against the colorful background.
- Position your subject (a person, a camel) directly in front of the brightest part of the sky.
- Set your camera’s metering mode to Spot Metering.
- Aim your camera’s meter at the bright sky (not the subject) and set your exposure based on that reading.
- Focus on your subject to ensure its outline is tack-sharp.
- Shoot from a low angle to separate the subject from the horizon, making it stand out more clearly.
Tip 8: Pay Attention to Your White Balance
White Balance (WB) controls the color temperature of your photos. While “Auto White Balance” works well in many situations, it can sometimes “correct” the warm, golden tones of a sunset, neutralizing the very colors you’re trying to capture.
Take Creative Control of Color
To enhance the warmth of the golden hour, switch your WB setting to “Shade” or “Cloudy.” These presets are designed for cooler lighting conditions and will add a beautiful, warm amber tone to your photos, intensifying the golden glow of the sunset. Shooting in RAW format (Tip #10) also allows you to adjust this easily in post-processing.
Tip 9: Focus Manually for Ultimate Sharpness
As the light fades, your camera’s autofocus system can struggle to find a point of contrast, leading to “focus hunting” and blurry images. Switching to manual focus is the pro’s choice for sharp desert sunset photography.
How to Manually Focus
Engage your camera’s Live View mode, which shows you the scene on the rear LCD screen. Digitally zoom in on a distant, high-contrast object (like the edge of a far-off dune). Then, carefully turn your lens’s focus ring until that object is perfectly sharp. Once you have set your focus, be careful not to touch the focus ring again. This technique guarantees that your landscapes are tack-sharp from front to back.
Tip 10: Always Shoot in RAW Format
If there is one technical tip to take away, it’s this: always shoot in RAW format, not JPEG.
What is RAW?
A JPEG file is a compressed image where your camera has already made decisions about color, contrast, and sharpening. A RAW file is an uncompressed, unprocessed file that contains all the data captured by your camera’s sensor.
Why is RAW Essential for Sunsets?
This unprocessed data is invaluable for desert sunset photography. The extreme dynamic range of a sunset means you will often need to recover detail from the deep shadows or the bright highlights. A RAW file contains all of this information, giving you incredible flexibility in post-processing to adjust exposure, correct colors, and fine-tune your image to perfection without losing quality. Editing a JPEG is like working on a photocopy; editing a RAW file is like working with the original negative.
Tip 11: Polish Your Masterpiece in Post-Processing
The final step to creating an extraordinary sunset photo happens on your computer. Post-processing is not about faking a scene; it’s about enhancing the natural beauty you witnessed and bringing your artistic vision to life.
A Simple Lightroom Workflow:
- White Balance and Tint: Fine-tune the warmth and color tones to match your memory of the scene.
- Exposure and Contrast: Adjust the overall brightness and use the highlights, shadows, whites, and blacks sliders to balance the dynamic range.
- HSL/Color Panel: This is where the magic happens. Selectively adjust the Hue, Saturation, and Luminance of the individual colors. Deepen the oranges and reds in the sky and enhance the golden tones of the sand.
- Masking: Use modern masking tools to selectively apply edits to just the sky or just the foreground for ultimate control.
- Sharpening and Noise Reduction: Apply a final touch of sharpening to make the details pop.
By following these professional tips, from choosing a photography-friendly tour with an operator like https://dubaidesertsafarie.com/ to mastering your post-processing, you will be well-equipped to conquer the challenge of desert sunset photography. For more specialized safari options, exploring providers such as https://hafiztourism.com/ can also yield good results.
Frequently Asked Questions (FAQs)
1. What is the single most important piece of gear for sunset photography? A sturdy tripod. While a good camera and lens are important, a tripod is the one piece of equipment that is absolutely essential. It allows you to use low ISO settings for maximum image quality and the slow shutter speeds needed as the light fades, ensuring your photos are perfectly sharp. It’s the foundation upon which all great sunset landscape photography is built.
2. How do I prevent lens flare when shooting towards the sun? Lens flare (the bright spots and streaks of light) can be a creative element, but it often reduces contrast. To control it, always use a lens hood. You can also try to partially block the sun with an element in your composition, like the crest of a dune or a camel. Changing your shooting angle slightly can also dramatically reduce flare. Sometimes, using your hand to shade the front of the lens (without getting it in the shot) can work wonders.
3. What is the best camera mode to use if I’m not comfortable with full Manual? If you’re not ready for full Manual (M), the next best option is Aperture Priority mode (A or Av). In this mode, you set the aperture (e.g., f/11 for landscapes) and the ISO (e.g., 100), and the camera automatically chooses the correct shutter speed. You can then use the Exposure Compensation dial (+/-) to make the image brighter or darker, giving you a good degree of creative control.
4. How do I get those photos with the sharp, starburst effect from the sun? The “sun star” or “starburst” effect is achieved by using a small aperture. Set your camera’s aperture to a high f-number, such as f/16, f/18, or even f/22. The smaller the aperture opening, the more pronounced the starburst effect will be. This technique works best when the sun is partially obscured by an object, like the edge of a dune.
5. My sunset photos look dull. How do I make the colors pop? This is a common issue. First, shoot in RAW format to capture the maximum color information. Second, use a Circular Polarizer filter, which can help deepen the blue sky and increase color saturation. Third, in post-processing software like Lightroom, use the Vibrance and Saturation sliders moderately. The most powerful tool is the HSL/Color panel, where you can selectively boost the saturation and adjust the hue of the specific oranges, reds, and yellows in your photo.
6. What are the best subjects to use for a silhouette photo? The best subjects for silhouettes have a clean, recognizable shape. In the desert, this includes camels (especially in profile), people in dynamic poses (like jumping or with arms outstretched), a Falconer holding their bird, or the sharp outline of a 4×4 vehicle on a dune crest. The key is to ensure the shape is distinct and not cluttered.
7. Should I use a UV filter on my lens in the desert? Yes, it’s highly recommended. While a UV filter has a minimal effect on the image itself, it serves as a crucial layer of protection for the expensive front element of your lens. In the desert, blowing sand can easily scratch your glass. It is far cheaper and easier to replace a scratched filter than to repair or replace an entire lens.
8. How do I capture the texture and ripples in the sand? To capture texture, the direction of light is everything. The low, side-lighting of the golden hour is perfect for this. The light skims across the surface of the sand, creating tiny highlights and shadows that reveal the intricate patterns and ripples. Shooting from a low angle can further emphasize this texture. In post-processing, increasing the Clarity or Texture sliders can also help to make these details pop.
9. My camera’s autofocus hunts in low light. What’s the best way to focus? Switch to Manual Focus (MF). Turn on your camera’s Live View, find a very distant, bright object (like a star, a far-off light, or the bright edge of the moon), and use the digital zoom on your screen to magnify it. Then, manually turn the focus ring on your lens until that point of light is as small and sharp as possible. This is known as focusing to infinity and is the most reliable method in the dark.
10. What is HDR and when should I use it for sunsets? HDR stands for High Dynamic Range. It’s a technique used to capture scenes with a very large difference between the brightest and darkest areas, like a sunset. You should use it when you find that in a single photo, either your sky is completely white (blown out) or your foreground is completely black (crushed). By taking multiple bracketed exposures and merging them into an HDR, you can create a single image that has rich detail in both the vibrant sky and the deep shadows of the dunes.
11. Is a full-frame or a crop-sensor camera better for desert landscapes? Both can produce stunning results. Full-frame cameras generally perform better in low light (less digital noise at high ISOs) and can achieve a wider field of view, which is great for vast landscapes. However, modern crop-sensor cameras have excellent image quality, and their smaller size and lower cost make them a fantastic choice for travel photography. The quality of your lens and your skill as a photographer are far more important than the sensor size.
12. How do I balance the exposure between the bright sky and dark sand? This is the classic sunset photography challenge. The best tool is a Graduated Neutral Density (GND) filter. This physical filter is dark on top and clear on the bottom, so you can align the dark part with the sky to reduce its brightness, allowing your camera to capture the entire scene in a single, well-balanced exposure. The alternative is to use the HDR technique by blending multiple exposures in post-processing.
13. What is “exposing to the right” (ETTR) and should I use it? ETTR is an advanced technique where you intentionally make your photo as bright as possible in-camera without blowing out any important highlights. The theory is that this captures the maximum amount of light and detail in the shadows, resulting in a cleaner image with less noise when you darken it back to a normal level in post-processing. It can be a powerful technique for clean sunset photos, but it requires shooting in RAW and carefully watching your camera’s histogram to avoid losing detail in the sky.
14. Can I get good sunset photos with just my smartphone? Yes, modern smartphones are incredibly capable. To get the best results, use the “Pro” mode to control settings manually. Tap on the bright sky to set the exposure, which will naturally create beautiful silhouettes. Use the phone’s HDR mode to balance the light. A small, portable smartphone tripod can help you get sharp, clear shots in low light and is great for shooting timelapses of the sunset.
15. What’s a common composition mistake to avoid in the desert? A very common mistake is placing the horizon line directly in the middle of the frame. This can make the image feel static and divided. Instead, use the rule of thirds. If the sky is spectacular, place the horizon on the bottom third of the frame to emphasize the sky. If the foreground sand has interesting textures or lines, place the horizon on the top third to give more importance to the landscape.
16. How do I clean my gear after a desert safari? First, use a rocket blower (not your mouth and not canned air) to puff away all the loose sand from the camera body, lens crevices, and lens mount. Do this before wiping anything. Then, use a soft-bristled brush to gently remove any remaining particles. Finally, use a microfiber cloth to wipe down the body and a dedicated lens cloth or wipe for the glass elements. Be gentle and methodical.
17. What is the “Blue Hour” and why is it good for photography? The blue hour is the period of twilight just after the sun has set and the vibrant “afterburn” colors have faded. The sky takes on a deep, rich blue color, and the ambient light is incredibly soft and even. It’s fantastic for creating moody, atmospheric landscapes. It’s also the perfect time to capture the warm lights of a desert camp against the cool tones of the sky, creating a beautiful color contrast.
18. Should I use flash for portraits during sunset? Yes, using a “fill flash” is a great technique for sunset portraits. If you expose for the beautiful sunset sky, your subject will normally be a dark silhouette. By using a flash on a low power setting, you can “fill in” the shadows on your subject, illuminating them while preserving the rich colors of the background. This creates a balanced, professional-looking portrait.
19. How long should my shutter speed be for a sunset? There is no single answer, as it depends on your aperture, ISO, and the available light. On a tripod with ISO 100 and an aperture of f/11, your shutter speed might start around 1/125s during the golden hour and become progressively longer, potentially reaching several seconds long well into the blue hour. The key is to adjust the shutter speed to achieve the exposure you want.
20. What is the best way to back up my photos on a trip? Never rely on a single memory card. It’s best practice to back up your photos every single night. You can do this by transferring the files from your memory card to a laptop computer. For extra security, you can also back them up to a portable external hard drive or an online cloud storage service if you have a reliable internet connection. Losing the photos from a once-in-a-lifetime trip is a photographer’s worst nightmare.